Welcome to another Film Editing Pro tutorial! In this post, our trainer, Leon, is going…

How to Create Sync Maps and Multicam Sequences in Premiere Pro
Today we’ve got an incredibly useful editing tutorial from guest writer Brian Levin. In this article, you’ll learn step-by-step how to create an audio/video sync map and set up your multicam sequences in Adobe Premiere Pro. Let’s get started.
Enter Brian.
If you do any kind of editing in Premiere, it’s likely that you’ve come across the need to sync your audio to your video. You might already have a favorite method for doing this but today I’d like to share mine.
But first…
What is this process for?
A sync map is something that you will typically build if you are working on reality TV, documentaries or live events. It’s exactly what it sounds like, a long timeline of all of your audio and video in sync, like a roadmap of all of your footage.
As someone who edits a lot of projects with multiple cameras and audio recording devices constantly starting and stopping without slates, a sync map is very useful for me to lay everything out in a single timeline and get a sense of what is happening in the footage and when it is happening.
A sync map is a great place to begin if you need to make one very complicated multicam sequence to edit with.
Multicam sequences
You are probably wondering why I’m going to suggest you make multicam sequences instead of Merged Clips or entirely new media. So first, let me explain what a multicam sequence is in case it’s something you are unfamiliar with it.
A multicam sequence works a lot like a new timeline, except that its default setting is to have multicam enabled when you bring it into your timeline to edit. Other than that, it will look, feel and act very similarly to a new timeline that you create manually.
A multicam sequence can be created in several different ways, which we will explore below. The important thing about a multicam sequence is that it will preserve the metadata of the original footage when you create the multicam clip, whereas a merged clip will remove certain metadata that you may find useful laterin your editing process.
Another great advantage of working with multicam sequences is that you can have several streams of video in one sequence. This is great if you are filming a movie and have 2 or more cameras rolling at the same time, or if you are doing something like a live event or reality program where you will have several cameras starting and stopping frequently.
Creating individual multicam sequences is fundamental to getting started as you edit, it builds a strong organizational foundation for you to work with, and makes the editing process easier, smoother and more efficient.
So let’s begin with how to put all of this together.
Scenario 1 – Footage and audio with matching timecode
If you are editing a movie, be it a feature or a short film, some documentary and reality, you may find that the cameras used on production (such as an Arri Alexa) have timecode that matches the exact timecode of the audio files.
This is the best scenario to end up with. Not only does this make syncing easy and exact, but it also saves you time not having to sync by hand, or hunt down the right piece of audio for the right piece of video.
The Scenario #1 Sync Map
This is one of the few cases where I don’t make a sync map for my footage. Since your video and your audio will be sharing the exact same timecode, syncing them up is something you can do in your bins, and not something you necessarily need to do in your timeline.
This is personal preference, and as an assistant or an editor, you may prefer a different method. In this case, I skip directly to making multicam sequences out of my clips for logging purposes.
Setting up your multicam sequences
Thanks to my friend Tim Troy (http://www.imdb.com/name/nm1873073/) and his short film Ding Dong (https://www.facebook.com/DingDongMovie/), I have two clips that I’m going to use as examples here.
On this film, we had a smart slate which was showing timecode, and we were also able to jam the timecode to the camera. However, if you want to use this method to sync audio to video, and you have a smart slate but were not able to jam sync the audio to the camera, you can change the timecode of your clips individually.
To change timecode of a clip, you would right click on a clip, and select Modify – Timecode.

Using the controls in this window, you can change the timecode of a clip in the bin.

Simply type in the new timecode, and make sure you are using the correct time display format based on your camera and audio recording systems. In this case we were working with a 23.976 frame rate.
For the sake of simplicity, I’m doing this with only two clips. Now, back in the bins, I have my clips and my audio files, like so:

The goal is to connect those audio clips with the appropriate video clips by using the timecode, and nothing else. To do this, I select the video clips, and then I also select the audio clips.

Right click and select Create Multi-Camera Source Sequence.

This dialog box will appear.

In it, we want to select Timecode as the synchronize point.
At the top of the box, you can indicate how you want to label the clips. In this case, we could change Video Clip Name to Audio Clip Name, since the audio clips are already labeled with scene, shot and take. However, I personally prefer to name clips myself, and so I may leave it as is.
Under timecode, if you were to select Create single multicam source sequence, you would effectively be laying all of the video clips and all of the audio clips out on one timeline. This might be great if you want to do a stringout later on, but for this case, we want individual clips in the bin with which to edit, so we’ll leave that unchecked.
With this dialog box, I typically leave “Move source clips to Processed Clips bin” unchecked because I like to move my clips to a completed folder elsewhere later on, however you can enable this if you want Premiere to automatically organize completed synced clips for you.
Once we click OK, the operation may take a few seconds, and we end up with new multicam clips in our bins.

You can now begin to label and organize these clips to edit with. In a sequence, they’ll appear as such:

You can always adjust the timing of the audio inside of the multicam sequences if you feel that the audio isn’t lining up. Sometimes a camera or an audio device won’t stay in sync all day long on a shoot, and it’s possible that there will be slight drift to the timing.
If you want to get very specific while adjusting audio inside of a multicam, you can change the way you view the sequence by looking at Audio Time Units as opposed to timecode.
To enable them, use the three dashes next to your sequence name and check the box Show Audio Time Units.

With this, you can zoom in much farther on the timeline than a single frame, to more specifically move and adjust audio to fit the sync.
It’s possible that the footage you get back from a shoot may not have been so lucky as to feed timecode to the camera, or have a smart slate. In this case, scenario 2 is your best bet for syncing footage.
Scenario 2 – Footage with a slate, but without matching timecode
One of the more common scenarios that I run into when I am editing is that I have video files and audio files, but they were not sharing the same timecode during shooting. This could be for many reasons, perhaps the camera being used doesn’t support jamming timecode, or perhaps the audio recordist didn’t set this up, or it’s possible that the equipment was malfunctioning.
Whatever the reason, this means that one of the few options you have for syncing your video and your audio is to use the visual slate clap. They come in many forms, from a nice slate with timecode on it, to a simple hand clap.
The Scenario #2 Sync Map
For me, a sync map in this scenario is only useful if I am syncing several cameras and audio sources together. Most commonly I find this happens when I’m working on something like a documentary, where 2 or more camera operators are starting and stopping their cameras, while the audio recordist has kept his/her audio running the entire time.
For this example, I’m going to focus on a narrative film where the camera did not have any audio going into it, and was not recording a scratch track of onboard audio. All I have to go off of here is the slate.
(Disclaimers: to make this easy to understand I am only going to demonstrate using 3 clips, but in a real scenario you may have hundreds or thousands of clips to go through. I am going to also skip a conversation about organization in this article, focusing only on syncing, as that is a much more involved conversation for another article.)
Thanks to my friend Jack Marchetti (http://www.imdb.com/name/nm5189782/?ref_=nv_sr_1) and his film Compatibility (http://compatibility.io/) for allowing me to use his footage and audio in this example.
Method 1 – Bin syncing
In this method, you do not need to create a sync map, instead you’ll be doing all of your syncing with In Point’s on the clips in your timeline.
I do this by going into each clip and finding the moment in which the slate clap occurs.
VIDEO: Finding the moment in which the slate clap occurs in each clip (:25)
I would go through and do this for all the video clips in my bins.
Then I would do the same thing, except for all the audio clips in my bins. This can usually be done by eye, but occasionally you’ll have to listen to the clip to find which sound is in fact the clap. I think we’re going to get lucky in this scenario.
VIDEO: Syncing your audio in the the bins (:26)
This is a great foundation to begin from, because it ties directly into…
Method 2 – Timeline syncing
To make a sync map of this, I lay out the video files in a new timeline. Fortunately for us, those we’ve already marked an In Point on those video files right where the slate clap occurs.

And then below these video clips I would arrange the corresponding audio, which we also marked an In Point for.

For personal preference, I trim my audio to the point where the video ends, like so:

Now it’s time to…
Create your multicam sequences
As seen above, there are two methods for doing this. The first is by using the In Point of the video and the In Point of the audio, and combining them in your bins. The other is to do this in the timeline.
I would normally sync from the bins if I know that everything is lining up really nicely, video on top of audio, individual shots broken up, everything aligning perfectly. If not, however, I would sync from the timeline where I can see in a visual space what video will end up going with what audio.
(Reminder: this is just an example, it’s very likely your syncing won’t look quite like this as you’ll be working with different footage, different audio, and an entirely different project.)
Method 1 – Bin syncing
As you saw above, we have set the In Point for our video and the In Point for our audio. So now we can select the correct video clip and the correct audio clip together.

Right click and select Create Multi-Camera Source Sequence.

In the dialog box that opens, there are several settings to play with, but in this case we want to connect these two clips via their In Point.

A few settings I have selected here that might be of interest.
- At the top, I have changed the naming convention to Custom, I’d like to name the new sequence in a format that I prefer when cut.
- Sequence preset is set to Automatic, however you can setup your own sequence preset or use an existing one. In this case, all of my footage is 1920×1080, and 23.976 frames per second, ProRes, so leaving it as Automatic will do the trick.
- I have unchecked “Move source clips to Processed Clips bin,” I have my own organizational method for this that is slightly different from what Premiere’s default is.
If you went ahead and made a sync map in your timeline, then you’ll want to use…
Method 2 – Link together clips in your timeline
This method will work great if you want to create independent clips from the synced up video and audio in your timeline. Here’s how I go about doing that.
Before you begin, you want to remove any empty audio and video tracks so that this is what your timeline looks like.

You will begin by selecting the video and the audio with your mouse.

Right click (or create a shortcut key) and select Make Subsequence.

This will create a new sequence in your bin.

You can rename this sequence as you see fit, for example I’ll call mine “04 – 01” because that’s how I prefer to see my scene, shot and take displayed in the bins.
(note about the audio and video tracks: the subsequence you create will take on the properties of the sequence from which it was created. If you are working with only one camera, you should only have on video track, if you are working with 2 channels of audio you should have a 2-channel sequence with the left channel panned to the left and the right channel panned to the right. There are more complex audio setups, for example my screencaps show 6 channels of audio, however audio channel mapping is a complex conversation for another article)
You can now use these subsequences to edit your movie. Inside of them is contained the original clip, on which all of the metadata has been saved for future use in sharing with your colorist or visual effects artists.
You can organize your clips any which way, but you cannot delete the original media, you should move this to a bin where it can safely live and be recalled later if needed.
Scenario 3 – Using “synchronize” to match scratch track with recorded audio
There is one final scenario which I find myself working on very often and that is in the documentary, event or reality space. This is where the sync map comes in handy more than any other time, and where you may have to make some creative technical decisions about how best to organize and arrange your footage.
Making the sync map
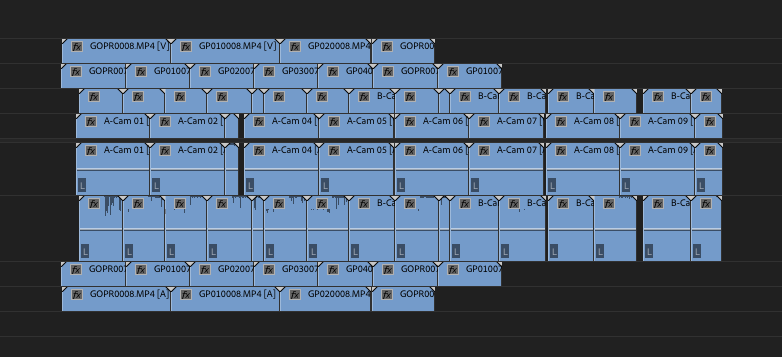
First, let’s take a look at a completed sync map, so that you have an idea of what I’m referring to.

This completed sync map was put together using the audio synchronize tool in Premiere. The tool listens to two audio tracks, and does it’s best to line them up next to each other based on the waveform of the audio. This is great if you do not have a slate clap, or any kind of indicator of when a shot should start or stop. It’s also great if you have, say, a GoPro camera that is running continuously, but was not started or stopped at the same time as your other cameras, as you can see in this map above.
The reason we need to build this map is so that I can bring this footage into my editing timeline as a multicam source sequence, and create my string out from it.
This is how I would get started working on building this…
VIDEO: Demonstration of steps #1 – 4 (10:26)
NOTE: This is a video demonstrating the process (Steps 1-4) to help you understand the workflow. Below the video, you’ll find detailed descriptions and screenshots of each step.
Step 1: Identify your main camera
You will want to figure out, in your footage, which camera is your main camera. This will be the camera that you put on the first layer of your new timeline. In this example, I was given four cameras, two main cameras were DSLR’s, and two additional cameras were GoPro’s. I assigned clip names to all my clips and organized them.

I then brought A-Cam into a new timeline on the first layer.

You can see I setup this timeline to have four tracks of video and four tracks of audio, which is what we’ll be working with for this map.
Step 2: Syncing the second camera
The next step is to bring in your second camera and place the video on track 2, and the audio on track 2.

We are now going to start lining up the A-Cam shots to the B-Cam shots by listening to the audio and synchronizing the waveforms.
(note about this: it doesn’t always work. In this example it will work, however I have had countless clips that I could not sync with this method, in which case I look for specific visual cues to sync up, a fast hand movement or anytime two objects touch, which you can usually line up by eye and to the exact frame)
I select the first A-Cam shot.

And then I hold SHIFT and select my first B-Cam shot.

With both shots selected I can right click (or use your shortcut key of choice) and select Synchronize.

This dialog box will come up.

You want to select Audio. When it asks for which track channel, what it’s doing is looking at that track as the primary audio source to sync to. You can ask it to sync to any track channel selected, or you can change it to mix down, where it will listen to a mix of both audio sources together and determine where they best fit.
Changing the track channel options has occasionally saved me when Premiere was having a tough time syncing two clips of audio. You’ll see this progress bar:

And if successful, you’ll now have two clips that are in sync.

This next part is very important, take a look at where these clips are in your timeline.

You can see that the first clip from A-Cam has moved to later in the timeline to meet the first clip from B-Cam. This will be the normal operation for this technique, the clip that appears EARLIER in the timeline will move to meet the clip that appears LATER in the timeline.
Knowing this, we can start to organize our timeline a little bit better.
Step 3: Organizing the flow of your sync
First, we want to make sure that there is nothing left in that first A clip to sync to the next B clip. So what I’ll do is make a cut at the end of the first B clip:

Then I will select all of my clips to the right of this cut and move them forward in time.

Now I will try to synchronize the rest of the A clip with the next B clip. After performing that operation, I end up with this:

This means that the B camera never stopped rolling, and this clip appears immediately in time after the end of the previous B clip.
So I will go ahead and close that gap, and then move my next group of B clips forward in time.

It’s time to connect my next A clip to this sequence.
So just like before, we’ll grab the next A clip, and the next available B clip and run the Synchronize command. This is what we got.

Now it should start to make a little bit more sense, as we begin to piece together the puzzle of clips and time.
We want everything to be in time with itself, so we’ll want to find out if the beginning of that 2nd A clip belongs underneath the end of that 2nd B clip.
What I do here is make a cut to separate the clip that I want to move forward. In this case, since the B clip appears earlier in the timeline, I’m going to cut the B clip, like so:

Then I will grab the B clip and the A clip, and run synchronize. My result:

Since we know that that B clip belongs next to the preceding clip, we can close this gap.

It looks like what happened here is that the B camera continued to roll, while the A camera stopped recording for a short time, then started rolling again, leaving a gap in time where the A camera was not rolling.
I’ll pull apart the rest of the sequence in this way until I have lined up all of the A camera with the B camera, carefully breaking clips into pieces and
Step 4: Syncing the third camera, and so on
Now that I have the second camera in sync with the first camera, like so:

It’s time to introduce our third camera, which is a GoPro. So I’m going to move my entire map back on the timeline and put my GoPro clips up front. I’d like to be moving my GoPro clips towards the sync map, instead of moving individual clips that are already aligned to match a single GoPro clip.
So here’s what that looks like:

Now we simply repeat the same steps we did before, being careful to make sure that the clip we want to sync appears earlier in the timeline than any part of the sync map that we are syncing to, so that we don’t disrupt the location of any clips already in sync with each other.
This is what I have chosen to synchronize.

And this is the result:

Hopefully the rest of our clips will sync to the A camera as easily as this first one did.

We are in luck.
Step 5: Repeat for additional cameras
In this case, I have a total of four cameras to sync. So I will take my fourth camera, which is another GoPro, and continue along the same path, this time using video and audio track 4, and continuing to sync to the A camera clips.
A few pictures as a reminder of that process:


And finally, the completed sync map.

Step 6: Setting up your multicam clips
In this case, I will not be creating a series of individual multicam source clips, as my entire sync map is effectively my source.
This sync map could be a lot of different things. Some editors may prefer to take one day’s worth of footage and create this, while other may do it scene by scene. It’s up to you how you will organize your clips.
This scenario’s footage comes from a friend of mine who creates social experiment videos for YouTube, and comprises an entire day’s worth of footage. This is useful for me to build because I can take my multicam sequence, lay it out into my editing timeline, and begin to cut it up into selects, which I will then string out and organize. This is the same process I follow when I am cutting anything with interviews, particularly interviews that utilize more than one camera.
Now that we have this sync map setup, you can use the sequence in which it is enclosed and drag that sequence into your edit sequence, like so:

To turn this into a multicam sequence, use this menu option:

And there you have it, your sequence is now setup as a multicam sequence.
(note: just a reminder that this tutorial has been about creating a good sync map and then creating a multicam source sequence out of it, I have not gone into any kind of detail about the proper audio channel mapping)
Wrap up
Although this process may appear to be very tedious, it is one of the most crucial parts of the editing process. Whether you are syncing your own audio, or you have an assistant who will be handling that process for you, properly syncing and preparing your clips for editing is the first and most important thing you can do to set yourself up for success throughout the entire post-production process.
Be sure to check out these 40+ Premiere Pro tutorials to learn more from Brian!
Leave Your Thoughts & Comments Below:
Related Posts


