We've all heard of Speed Ramping, but how can you actually use this tool effectively…

The Editor’s Guide to Working With Still Images in Premiere Pro
Still images are widely used in documentaries, news stories, show openers, wedding videos, corporate movies and other video productions, and Premiere Pro has very good support for still image formats.
You can import still images that are up to 32K in either dimension, but the image must have less than 256 megapixels total. So, 32K × 8K can be imported, as can 16K × 16K—but not 32K × 32K.
Most images you throw at Premiere will just work. There are two noteworthy exceptions, though: CMYK images and Camera RAW files are not supported.
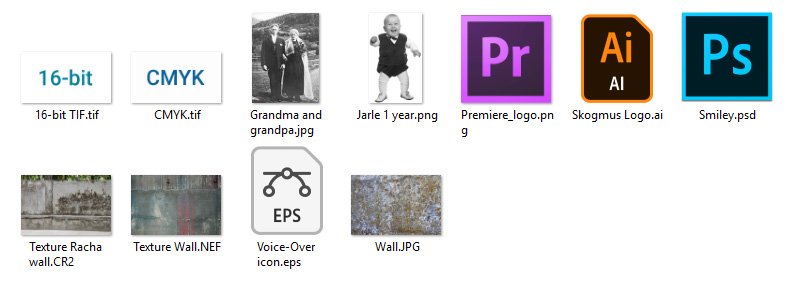
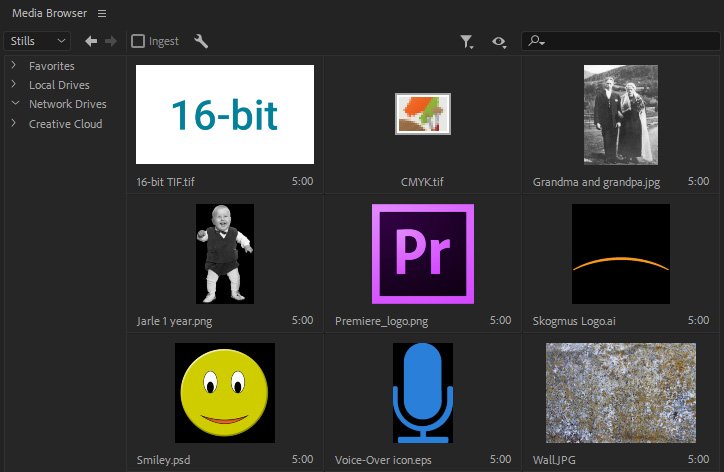
Figure 1 shows the files in a folder in Windows Explorer. Figure 2 shows the same folder viewed in the Media Browser inside Premiere. Two files do not show up at all in the Media Browser—the RAW images from a Canon DSLR and a Nikon DSLR. These cannot be imported into Premiere.
Preparation
Don’t just import your still images and start editing. There are a few things you should check first, and fix if necessary, to ensure a trouble-free editing experience.
Convert CMYK to RGB
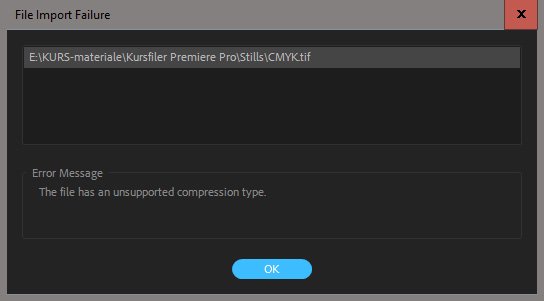
One file in Figure 2 has no preview, just an icon from the app that’s set to open it by default. This is a TIF image that’s made with CMYK colors, meant for printing. If you try to import it, you’ll get an error message, saying it’s got an unsupported compression type—see Figure 3. This isn’t really true. It’s the color space, not the compression that’s unsupported. Nevertheless, the file will not work, so you’ll need to convert it to RGB colors in Photoshop or a third-party software.
If you don’t have Photoshop, you can use an online converter like CMY2RGB to convert the image to RGB colors.

Set Your Rendering Preferences
Premiere uses quite a bit of RAM when editing still images. To avoid instability issues, you can set the memory preferences to Optimize Rendering for Memory, instead of the default, which is Performance. Your system may get a bit slower, but will be more stable.

Set the Default Still Image Duration
If you find yourself always adjusting the duration of still images in the timeline, you can save some time by setting a different default duration in Timeline preferences.

You can also change the duration of stills from the bin and in a sequence. We’ll have a look at this later.
Auto-Scale Your Stills before Import
Especially if you have a decent Graphics Card (GPU), playing back still image montages, scaling and zooming inside still images, etc. will usually work well. Premiere also has options for Scale to Frame Size and Fit to Frame Size.
But Premiere Pro uses more RAM and GPU memory the more images you import—and the larger they are. So, importing a huge amount of very large images is not a good idea.
To reduce the strain on the CPU and GPU, you can batch convert the images to about 200% of the sequence Frame Size before you import them. If your sequence is 1920px wide, you can scale large DSLR photos down to 3840px wide, and still have lots of room for zooming and pan-n-scan in the image.
I like to use Adobe Bridge for this, since it’s got great tools for browsing, renaming and adding metadata to images. In Bridge, select the images you want to scale, and click Tools > Photoshop > Image Processor.
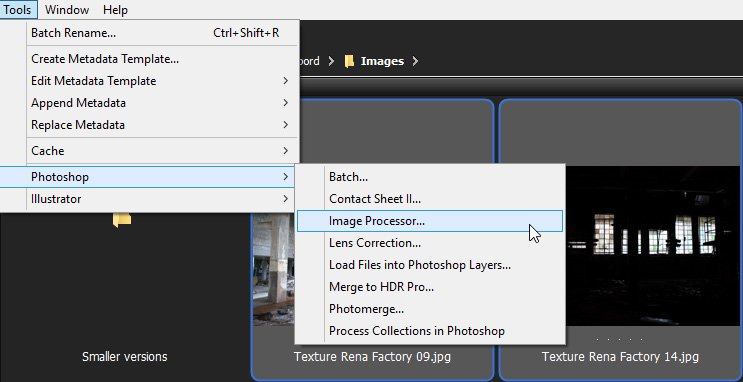
In the dialog box, choose the size, format and destination for the processed images. Tiff is probably a better choice than JPG, since JPG can introduce compression artifacts. When you’re done, Hit Run, and watch Photoshop automatically open, resize, and save all the images.
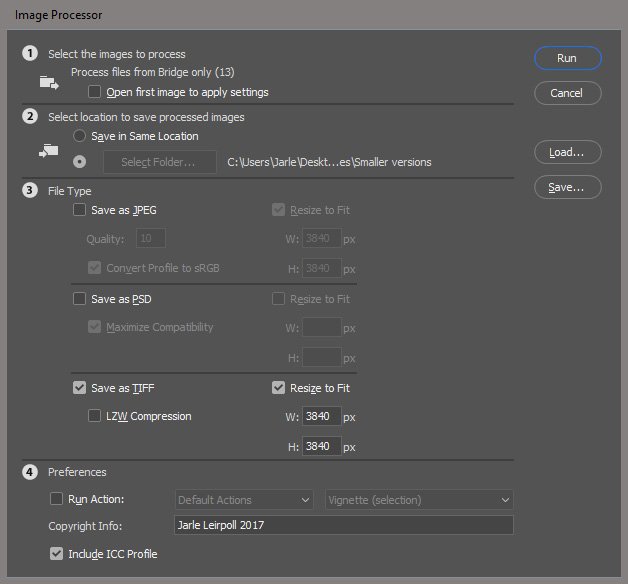
At the bottom of the dialog, you will find the option to run an Action. If you don’t know about the power of Actions in Photoshop, read about it in the online Photoshop documentation.
If you don’t have Bridge, start the same process from Photoshop: File > Scripts > Image Processor. You can even create a Photoshop Droplet on your desktop that you can just drop a bunch of images on, and Photoshop will automatically do the scaling, renaming, flattening etc. for you.
Read about creating Droplets and other features in the online Photoshop documentation about batch processing.
Now that you’ve made sure your images are optimized for editing in Premiere it’s time to import them.
(NOTE: We’ve put together a complete Premiere Pro editing course with 40+ video tutorials if you’d like to learn more)
Importing Stills
I recommend that you skip the File > Import routine and use the Media Brower to import your still images instead. As you’ve already seen, the Media Browser gives you a nice preview of all supported fie formats, including the vector based formats, which can sometimes be problematic to preview in your OS.
To import the files, point the Media Browser to the folder they live in, and select the files oy want to import. Then drag them to a bin, or use the keyboard shortcut Ctrl+Alt+I (Cmd+Opt+I) to import them.
Note that the default keyboard shortcut on Windows will not work if you use the Windows Magnifier tool to zoom in on the tiny icons and type on your high-res laptop screen. Instead, your screen colors will be inverted. See Windows Support for details. Just change the keyboard shortcuts in Premiere to avoid conflicts.
Importing Layered Photoshop Files
When you import Photoshop files with more than one layer, Premiere wants to know what to do with those layers, and will throw a dialog box at you. Here you have four choices.
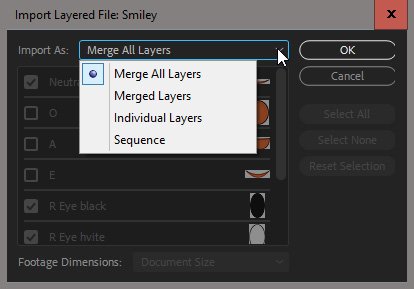
- Merge All Layers. This will flatten the image and treat it like any flat image, like a PNG or JPG file. Layers that were turned off in Photoshop will not be visible.
- Merged Layers. This is similar to the first choice, but you can choose what layers to include, no matter what visibility settings they had in Photoshop.
- Individual Layers. This will give you a choice to what layers to include, like the Merged Layers option, and import all the chosen layers as separate clips in Premiere.
- Sequence. This option gives you a sequence with all the chosen layers stacked on top of each other. It also gives you an additional Footage Dimensions choice between Document Size and Layer Size.
This last option was probably meant to work like in After Effects, and decide where the anchor point for each layer is set. In Premiere, the anchor point is correctly set to the center of each layer just as in After Effects, but in addition, all the layers are also moved to the center, destroying the layout of the Photoshop file.


This mangled thing is probably never what you want, so avoid it like the plague. We could use a new feature because with the Document Size setting, the anchor point is set in the middle of the Sequence, making it hard to move, rotate and scale layers. What we need is a third option that keeps the layout and sets the anchor point of each layer in its center without moving the layer.
Join the crowd and ask Adobe to fix this by filing a Feature Request.
Note that layered TIF files will always be flattened in Premiere, so if you need the separate layers, use Photoshop to convert TIF images to PSD.
Don’t add new Layers in PS
When you have imported a layered Photoshop file, you can edit it and make changes via the Edit Original feature. This is really handy! Select the clip and hit Ctrl+E (Cmd+E) to open the file in Photoshop. When you’ve made the changes, hit Save, and they will show up in Premiere
A little warning if you want to add new layers in Photoshop after opening a layered file with the Edit Original feature: If the file was imported as separate layers, any new layers you add in Photoshop will not be available in Premiere, and you will have to re-import the file. If the file was originally imported as a flattened file, it will work as expected, and changes will show up in Premiere.
Importing Vector Graphics
Premiere supports EPS and AI vector files, which are very common file formats for logos and vector art. They will be flattened, so no individual layers are available, and the size will be whatever it was set to be in Illustrator. Many logos and other vector graphics will be very small when imported.

Since this is vector art, your instinct will probably tell you that “I can just scale this to the size it needs to be”. But that’s not the case. Premiere converts the vectors to pixels, and you will be scaling pixels from a low-res image. This will make the logo blurry.

The solution is to scale the vector art in Adobe Illustrator. Open the file in Illustrator, marquee-select all the shapes and click Object > Transform > Scale. Scale it to the size you need. I made mine 500% bigger.
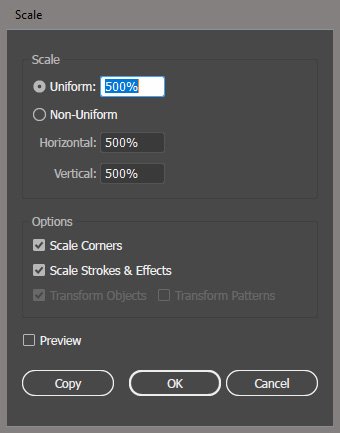
Now click Object > Artboards > Fit to Artwork Bounds. Before you hit save, you may want to change the color mode to RGB, as many logos and other artwork is made in CMYK, meant for print. File > Document Color Mode > RGB.
To avoid damaging the original file, save it with a new name and import it to Premiere. The edges will now be razor sharp in Premiere. If you don’t worry about destroying the original (because you have a backup) you could of course also use the Edit Original feature to open it in Illustrator from within Premiere, and save a few steps.

Another approach is to use Dynamic Link to After Effects to fix the bad scaling issue. Scale the clip in Premiere, then right-click the clip and choose Replace With After Effects Composition. The clip opens in After Effects, and you’ll need to give the After Effects project a name and decide where to save it.
Click the Continuously Rasterize switch for the layer—the one that looks like a sun.

Back in Premiere, the edges will now be razor sharp. It’s a good idea to save the project in After Effects so you don’t lose your changes.
Import RAW files via PS
RAW files from DSLR cameras, like Canon (.CR2) and Nikon (.NEF) raw formats cannot be imported directly into Premiere. But you can use Photoshop to embed the image in a PSD file that Premiere can import.
Import the raw file to Photoshop, then right-click the layer and choose Convert to Smart Object. Save as a Photoshop Document (PSD) file and import the PSD to Premiere. If you need to make changes, use the Edit Original feature and add the Camera Raw filter by clicking Filter > Camera Raw Filter to edit the pixels without any loss. Hit File > Save, and watch the image update in the timeline in Premiere.
Since the PSD file will contain the full info from the RAW file, you should expect slower performance when you use this method.
Import Image Sequences
You are likely to encounter image sequences when editing 3D animations, stop motion films and time-lapse footage. They’re all basically the same: A collection of images that should be treated as frames in a video file.
To tell Premiere to treat a bunch of images as an image sequence, activate Import as Image Sequence in the Media Browser panel menu.

With Import as Image Sequence active, select only the first image in the image sequence, right-click, and choose Import.
The imported clip may look like it’s just a still image, because it takes its name from the first file in the sequence. In my case, it was just named 00005.jpg. But if you open it in the source monitor or put it in a timeline, you will see that it’s actually behaving just like any other video clip.
If the movement is too fast or too slow, right-click the clip in the bin, and choose Modify > Interpret Footage and enter the preferred frame rate under “Assume this frame rate”.
If the image sequence was created in a DSLR camera, chances are that it will not be the same size as your Premiere Pro sequence.


Premiere will only import image sequences with continuous sequence numbers in the file names. So, if you have files named Lego 0001 to Lego 0100, but Lego 0009 does not exist, your imported image sequence will only contain the first eight files.
To avoid gaps in the file numbering, I use the Batch Rename feature in Bridge before I import the image sequence to Premiere.
Select the files in Bridge, and choose Tools > Batch Rename. Choose to include a text, like “Lego “, and a sequence number starting at 1, with as many digits as needed to include all the images.
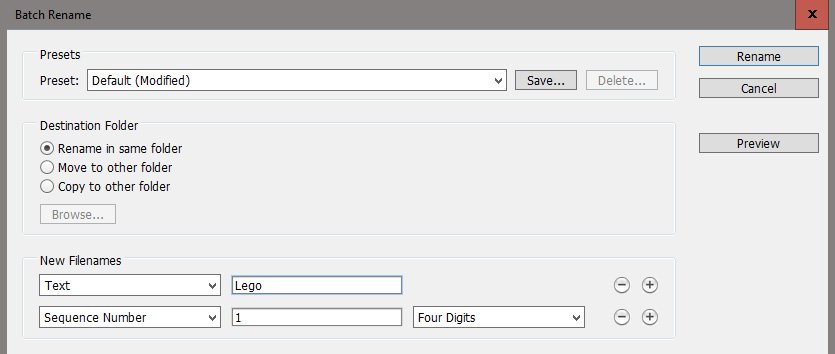
Importing this kind of footage as an image sequence instead of importing them as separate image files will make sure Premiere uses a lot less RAM to process them.
Change the Duration of your Stills
Even if you’ve set the Preference for Default Still Image Duration, you may want to change the duration of several stills after they’ve been imported—or even after you’ve put them in a sequence.
To change the duration from a bin, select the clips in the bin and hit Clip > Speed/Duration, or use the keyboard shortcut Ctrl+R (Cmd+R). The only available option will be Duration.
The duration you set here will be the duration of the clip the next time you put it in a timeline. The instances you have in a timeline already will not be affected, due to Premiere Pro’s “Do no harm” philosophy.
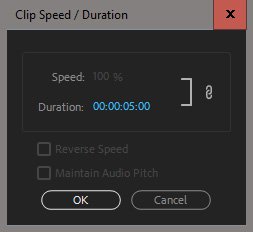
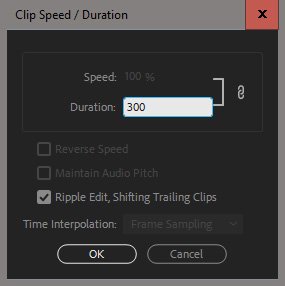
If you want to change the duration of stills in a timeline, use the same procedure as in a bin: Select the clips in the timeline and hit Clip > Speed/Duration, or use the keyboard shortcut Ctrl+R (Cmd+R). In addition to Duration, you will also have the option to Ripple the changes.


Editing a Still Image Montage
Even though you can import still images that are up to 32K in either dimension, the maximum possible frame size of a Premiere Pro sequence is 16K by 8K (16,384 × 8,192). Most likely, your sequence will not be this big, but rather HD or 4k resolution. If your images were shot with a DSLR at 8k, there’s nothing stopping you from editing your footage in an 8k sequence though—just be aware that the performance during editing may not be stellar.
Storyboarding
I always use a bin as a storyboard where I decide the order of the images. Drag the images around in the bin, trying out different orders. When you’ve decided on the order, click on the first image in the bin, and shift-click the last one you want to include, then use the Overwrite command (.) to move the images to the timeline.
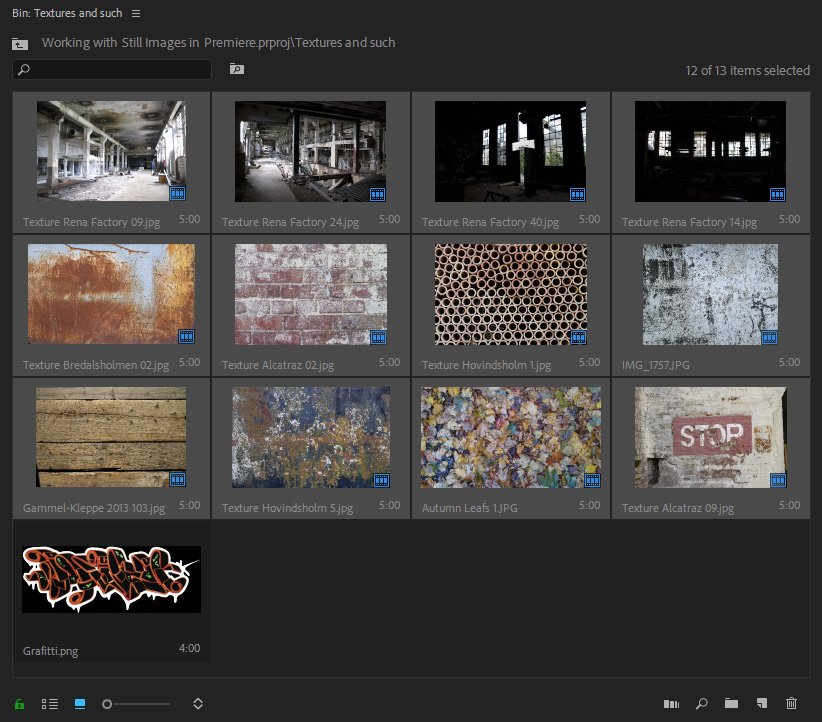
Yeah, I know every tutorial on this shows how to add markers while playing back music in your timeline, and then use the Automate to Sequence button in the bin to automatically add cuts or transitions at markers. I will not tell you how to do this for two reasons.
- You can easily find out how to do this.
- You should never make all your cuts on the beat. It very quickly gets boring to watch.
Anyway, here’s the sequence after I hit the Period key (.).

Scale to Frame Size vs Fit to Frame Size
If you want images and video to always scale to fit inside the size of the sequence, you can use one of two methods: Scale to Frame Size or Fit to Frame Size. They can both be found in the right-click menu for clips in the timeline, and in the Clip menu, under Video Options.

So, what’s the difference? The Scale to Frame Size option will resample your image at the size of the sequence. So, if you use this on an image that’s double the width of the sequence, you end up with an image that’s ¼ of the original pixel size, while the Scale will be set to 100%. This is a great way to reduce the strain on the system, but it will degrade the image if you scale it further.
The Set to Frame Size option, on the other hand, will not resample the image, but instead set Scale in the Effect Controls panel to whatever it needs to be to fit the image inside the frame. In our case, since we’ve batch scaled the images to 3840 px wide, that’s 50% for a 16/9 image. All the pixels are still intact, which is great when you want to scale the image further in the Effect Controls panel, but you’ll need more computer power.
Scale to Frame Size is also available in the bin. Select the clips you want to automatically scale to frame size, and click Clip > Video Options > Scale to Frame Size. When you put the clips on the timeline, they will auto-scale.
If you use this feature all the time, you should set this in your preferences. Click Preferences > Media > Default Media Scaling, and set it to Set to Frame Size. Or use Scale to Frame Size to reduce the strain on the computer, and remember to change it to Set to Frame Size for the clips you want to scale further, before you start scaling them.
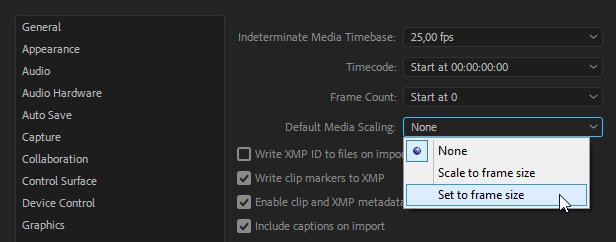
In reality, the Scale/Set to Frame Size options are not as useful as you’d think. Most images from a DSLR will not be 16/9 aspect ratio, so the scaling will result in letterbox or pillar box looks with black bars.

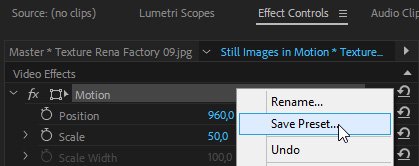
A much better approach is to create a Motion preset that scales the images to 50%, so you don’t get any black bars.
To make a preset like this, set scale to 50%, then right-click on the word Motion in the Effect Controls panel and choose Save Preset. Name it 50% Scale or something similar. Next time you need to scale 50 images, just select them all in the timeline, and throw this preset on one of them. Perfect scaling in less than a second!

Pan & Scan in the Images
To create a Ken Burns type zoom in on a detail in the image, we’ll use Position and Scale keyframes. Place the playhead at the time where you want the zoom to start, and click the Stop Watch icon for Scale and Position.

Now that you have set the start keyframes, move the playhead to where you want the zoom to end and adjust Scale and Position. I set mine at about 3 seconds into the clip.


When you play back the sequence, this movement will be linear, which means it will start and stop abruptly, and move at a constant speed. Nothing moves like that in real life, so to make this more natural, we’ll use Ease keyframes.
Select the first two keyframes in the Effect Controls panel and choose Temporal Interpolation > Ease Out. Then choose the last two keyframes and choose Temporal Interpolation > Ease In. This makes the movement accelerate out of the first keyframes, and slow down into the last ones.

Make Presets
If you have several images that are about the same size (and if you’ve used the auto-scale feature in Photoshop as explained earlier, you do) you can save a lot of time by making Zoom in and Zoom out presets. Save your favorite 8-10 animations as Effects Preset as explained above, and you’ll get pretty close to what you want with just a quick drag-n-drop.
Now use this Knowledge
The tips and techniques in this article are tools that can speed up your editing when working with still images, and at the same time getting the best possible image quality. But even after reading this article, it’s far too easy to fall into old habits again. You’ll have to resist doing things the way you’ve always done them, or you will not save time and get better results. Breaking old habits takes some effort, but your films will benefit from it.
You can continue learning how to use Adobe Premiere Pro in our course, Premiere Pro Quickstart.
Leave Your Thoughts & Comments Below:


