Today we'll be speaking with Robert Komatsu, ACE about his most recent film - Freaky…

4 Tricks for Shortening & Extending Music
A common task for a video editor is to edit stock music to work as if it were a custom score. This manipulation effectively “rewrites” the stock music theme through editing its recording, or track.
In this tutorial, you’re going to learn:
- Why you might need to “re-write” stock music
- How to “re-write” by deleting, repeating, and reordering
- Re-writing by adding instruments and effects
- Why even a custom score might need tweaking
Let’s get started.
1 – Why You Might Need to “Rewrite” Stock Music
A successful search for stock music produces a prerecorded track that aligns well with the general feeling and pace of the scene where it will be used. However, it’s very rare for the track’s own ebb and flow to match exactly what’s going on in the scene.
For example, your cue might:
- Build too quickly or slowly for the scene
- Feel too dense or too sparse
- Need some sort of audio exclamation points to support things happening on screen
So now what?
2 – How to Re-Write Your Music by Deleting, Repeating and Reordering
Step 1: Identify the Sections in Your Cue
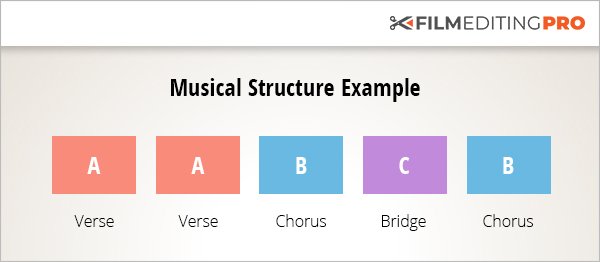
There are no hard and fast rules about the organization of a music theme. However, the vast majority of music has a structure built around the concept of sections.
These sections have names so musicians can talk about them. In pop music, you’ll find terms such as introduction, verse, chorus, and bridge. In other types of music, the naming convention may be simply alphabetic. This allows a shorthand description of the structure, such as AABCB, which would be a way of describing a structure of verse, verse, chorus, bridge, chorus, etc.
Why is this important for an editor to know?
Because the most elementary form of music editing is manipulating these sections. You can think of sections as building blocks. The composer has put the blocks in one order. Once you recognize them, you can duplicate them, delete them, or change their order to better fit the scene.
Step 2: Rearranging Your Sections
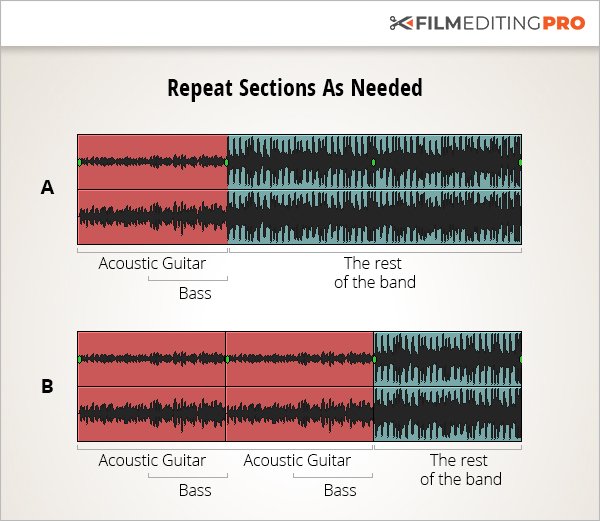
Here’s one example of how to manipulate your music cue by rearranging sections using a standard rock format:
Suppose the first verse starts with acoustic rhythm guitar and is joined halfway through by bass (A). The rest of the band – drums, keyboards, and electric guitars – comes in on the second verse. The first verse is just the flavor you want for a particular scene but it needs to be longer. No problem! Just repeat it (B). Again, any sort of manipulation is perfectly okay with stock music.
Step 3: Fine-Tuning Your Edit
Now that you’ve completed some of the most basic steps of editing your music cue, make sure you watch out for some of these common problems:
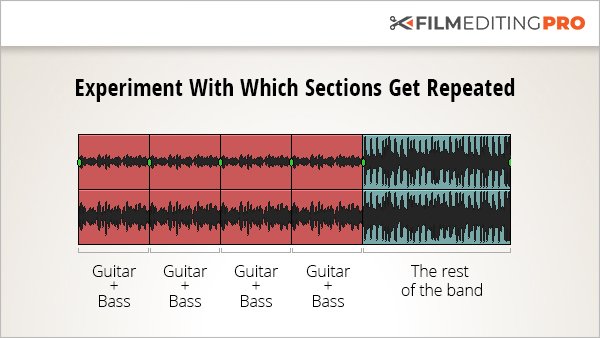
Problem 1: You can’t predict exactly how a music edit will sound until you try it. Repeating the first verse might sound terrific. On the other hand, the fact that the bass suddenly disappears at the edit point might sound odd. Now you hear it. Now you don’t!
The Solution: If that happens, you will have to experiment to find a better place to cut. In this example, you might find that repeating ONLY the second half of the first verse – after the bass has made its entry – sounds better.
Problem 2: Another thing to watch out for is the key change. If you want to cut from earlier in the track to the ending, as is often the case when editing commercials, be sure there hasn’t been a key change later in the song. Otherwise, it will sound like the whole band decided to end on the wrong chord. Oops!
The Solution: There are two workarounds for the key change. First, you can just do a fade ending while you’re still in the original key. Fades – and even clipped endings – are far more common and acceptable now than in the past. Second, you can locate where the key change occurred and try to incorporate that section into your finished cut. You may end up piecing together several excerpts, such as a beginning, middle, and end, to make this work. But hey, if it sounds good when you’re done, that’s all that matters.
3 – Rewriting by Adding Instruments and Effects
You’ve probably noticed that the sound tracks for films, trailers, and commercials often contain special effects that go beyond simple stock music. These are the whooshes, thuds, thumps, and drones that make a production really come alive.
Useful Effect 1: The High Drone
The drone is a musical sound that is held for an extended period. In other words, it drones on. A drone may be high or low and it may be used by itself or with other music parts that have some movement to them. The pitch of the drone is generally compatible musically with the key of the underlying music.
Back to our example with the acoustic guitar. Suppose you’ve looped the first verse to avoid getting into the part with the full band. But now it sounds a bit monotonous.
This would be a great place to gradually introduce a high drone to add some variety to the score.

Useful Effect 2: The Low Drone
A low drone works exclusively to add tension to a scene. There are some really great, complex, low drones to be found in music libraries.
So what should you be looking for?
- Low strings are a good place to start
- You might also try a synthesized drone sound. These often incorporate filters and other modulators that cause the sound to change as it progresses and can give a really unique effect to your cue.
Useful Effect 3: The Hit
Sometimes you need a sort of audio exclamation point – most often called a “hit” – to pump up your stock music track and give more impact to action on the screen.
Hits can originate in a variety of ways, from real sounds such as a metal door slamming, electricity arcing, or thunder, to percussive instruments such as cymbals, tympani, bells, piano, and harp, to entirely synthetic sounds created in the digital domain, such as whooshes and thumps. They can also be any combination of the above.
You’ll often see these types of sound design hits layered into music during trailers and other short promos, to increase the intensity of the piece and grab a viewer’s attention.

4 – Why Even A Custom Score Might Need Tweaking
Typically a custom post-score is written and recorded after the cut has been locked. This means there will be no more changes that affect the timing of the visuals, dialogue, or narration. Otherwise, the composer would be trying to hit a moving target.
But changes to a production are sometimes made after the post-score has been created.
- Maybe the client had a change of heart about something approved previously
- Maybe it’s an old edit being hauled out of the archives and given an update
Just treat the post-score exactly the way you would treat a piece of stock music in all the ways we just discussed. Shorten the cue, extend the cue, enhance it with effects like drones, hits, and so on.
Tip: It’s good to always archive a clean copy of the music, as well as the effects, when you complete a project. Don’t be stuck without the pieces you might need if a future revision becomes necessary!
Wrap Up
Here’s some important things to remember when it comes to rewriting your music through editing:
- A stock music track can be modified in any way you see fit
- It’s important to identify all the sections in your cue so you can delete, repeat, or reorder them
- High drones, low drones and hits are some of the easiest ways to give variety to your cue
- Re-editing a custom score can be done in the same way as a stock music cue
————
Wait, there’s more!
If you’ve enjoyed this tutorial, watch a FREE 3-part video series (over 40 minutes of training) that will teach you things like…the best methods for scoring a cut, how to create music changes and transitions, plus ways for adding variety to a cue – shown in a real-time editing demonstration.
Leave Your Thoughts & Comments Below:
Related Posts


