Today we'll be speaking with Robert Komatsu, ACE about his most recent film - Freaky…

How to Change the Dynamics of Music
Stock music producers design their recordings to sound good on a variety of playback systems, from high-end theater speakers to earbuds. But they can’t predict how the music will sound when combined with other audio layers in a larger production. It often falls to the video editor to make that mix work so that the entire soundtrack does its part in advancing the story line.
In this tutorial you’ll learn:
- Why you might need to change the dynamics of your music cue
- When you should make those changes, and…
- Some tips on how to make them
**As a bonus, you’ll learn about a tool from the world of radio that you can also use to automatically keep music and voice in the proper balance.
The Role Music Plays in Your Cut
Sometimes music is meant to be noticed.
“Woke Up This Morning” established the dark tone of The Sopranos right from the get-go. “Unchained Melody” made Ghost into the ultimate date movie. And “The Eye of the Tiger” got hearts pumping in Rocky III.
When music is featured, the original recording rarely needs any additional processing. Your job as a video editor is to stay out of the way and let the music shine.
But most of the time music isn’t the star. It sits in the background, one audio layer of many that enhances the emotional tone of a scene. It’s in this context that a music track often needs adjustment of its dynamics.
The Challenges of Dynamic Range
Dynamics is just another word for the fluctuations in audio level, or volume, in a recorded track. Speech – especially emotional dialogue – has tremendous dynamic range. Even within a single word, there can be a huge difference between the loudest and softest parts.
If the music being used under that dialogue also has wide dynamic range – such as orchestral music – you may have a problem.
Soft parts of dialogue may come at the same time as loud parts of music. This is how dialogue gets lost. The converse may also happen: The dialogue may overwhelm the music, which isn’t good, either.
Finding that sweet spot, where dialogue can be understood and music provides a solid foundation under it, is a challenge every editor faces. To meet this challenge, dialogue is nearly always processed to reduce its dynamic range. The same thing can be done to the music track.
Why Submixes Are Useful
In a simple scene with nothing but dialogue and a single music track, you can make any adjustments to the music volume in the main timeline. But what about more complex productions, such as action movies?
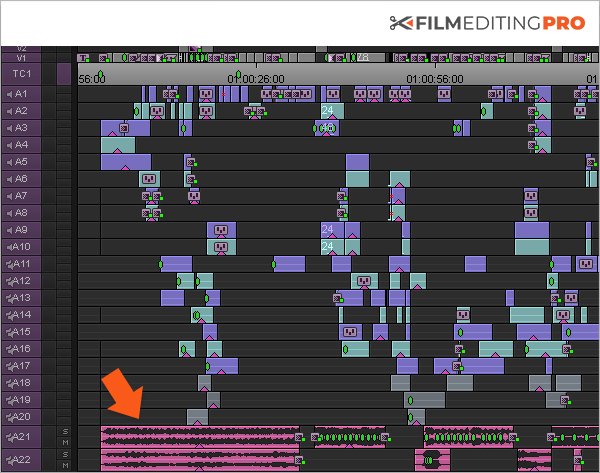
Think about a car chase scene. There are engines roaring, tires screeching, metal crashing, glass breaking, people screaming, maybe even guns firing, all in addition to music and dialogue. With all of those separate sounds, a timeline quickly becomes pretty complicated.
To make the mixing job easier, sound designers create submixes of dialogue, music, and effects. These are known as the D/M/E splits. Each split can be treated as a unit downstream when the editor does the final mix. The dozens of audio tracks that comprise a complex movie scene are reduced to just three stereo (or surround sound) tracks.
Not only do submixes simplify the final mix, they also simplify replacing the dialogue if the film is released in other languages.
As an editor, why do you need to know about submixes or splits? For two reasons:
1. You may get them from a sound designer if you work on a big project
2. If you don’t have a sound designer, it might be a good idea to make them yourself when adjusting your global mix at the end of an edit

Three Common Ways to Balance Out Your Volume
#1. Waveform Editing
With waveform editing, you can adjust the volume of your audio tracks in a couple different ways. You can turn the entire track up or down, a macro form of mixing.
Or you can work on different sections by setting in and out points in the timeline using keyframes, then pulling down or pushing up the volume within those sections. It’s sometimes called rubber banding because it looks a bit like you’re grabbing a rubber band and stretching it. You can think of this as a micro form of mixing.
Caution: The macro approach is typically too simple for most mixing jobs. However, the micro approach, while giving you more precision, can be extremely labor-intensive. Be prepared to spend a bit of time with it.

#2. Compression
Compression is probably the most useful of all audio processing tools. Its sole purpose is to make the volume of an audio track more consistent by reducing – or compressing – the dynamic range. When a track is compressed, the soft parts become louder and the loud parts become softer. The volume is then more “even” from the beginning to the end of the track. If compression is applied carefully to both dialogue and music, it is easier to find that sweet spot in mixing where both can be heard in the proper balance.
Problem:
You have a love scene with intimate dialogue and a piano track in the background. The feeling is right but some of the dialogue is getting lost in the rise and fall of the piano volume.
Solution:
1. Try compressing the music track first and see if a more consistent volume there solves the problem.
2. Do the same thing with the dialogue track. Note that compressing a track makes the overall volume softer so you’ll want to turn the compressed dialogue track up a bit to compensate. Chances are good that subtle compression on both the music and dialogue will help immensely.
#3. Limiting
Limiting is a special form of compression where both the threshold and the ratio controls are set very high.
This means that only the really loud sounds are affected (since the threshold is high) and, once the threshold is reached, a high compression ratio (12:1 or greater) kicks in. When the ratio is set at maximum, the threshold acts like a brick wall. In fact, this is sometimes called hard limiting or brick wall limiting and sometimes it can actually be quite useful.
Problem:
Suppose you have a battle scene and you’ve found the perfect heroic music cue to go with it. The problem is that the volume peaks in the music interfere with the sound effects of the battle. Now what?
Solution:
1. Try limiting the music track. Start with a relatively low ratio, such as 12:1. This means that a 12 db increase in volume is changed to a 1 db increase.
2. If 12:1 doesn’t solve the problem, try progressively higher ratios.
3. Experiment with the threshold control too, until you get the sound you’re after. Your goal is to reduce the level of the loudest parts of the music only.
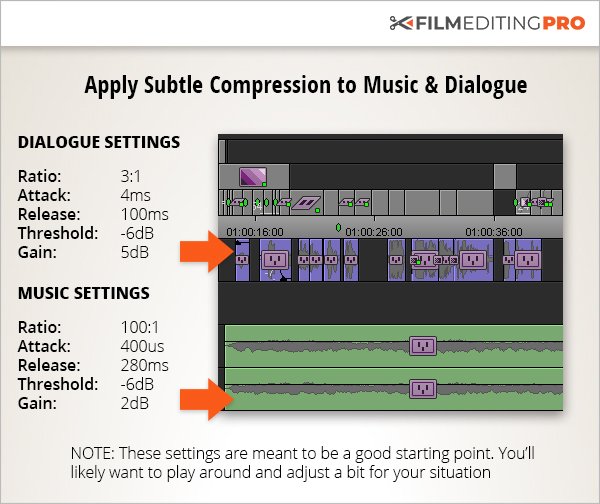
Here Are Some Settings To Get You Started
Good Dialogue Compressor/Limiter Settings
Ratio: 3:1
Attack: 4ms
Release: 100ms
Threshold: -6dB
Gain: 5dB
Good Music Compressor/Limiter Settings
Ratio: 100:1
Attack: 400us
Release: 280ms
Threshold: -6dB
Gain: 2dB
Bonus: Ducking – Your Secret Weapon for Balancing Dialogue and Music
Even when you’ve compressed or limited the music track, you may still need to do some fine-tuning with key framing and that can eat up a lot of time. When you just don’t have that kind of time, there’s one more processing tool you might consider.
Auto ducking is a process used a lot in live radio broadcasting to keep the background music softer than the announcer’s voice. Whenever the announcer speaks, the music volume is lowered or “ducked” automatically. The music returns to its normal volume when the speaking ends.
Ducking can also be useful for editors. If ducking is available in your editing software, it will be among the other dynamics processing options.
To Duck or Not to Duck
Think of ducking as an automated form of keyframing. The computer is doing the same thing you would do manually. The big difference is that if the voice track has to be moved, the ducking follows it.
Ducking is most useful in two situations:
1. You have a lengthy production to mix and a very tight deadline.
2. You are creating a rough edit for the director to review.
Wrap Up
Your Goal
With any sort of audio processing the goal is for the changes to be sonically transparent, meaning they aren’t noticed. With ducking, for example, you don’t want to hear a drop in the music every time someone speaks.
Achieving transparency takes a bit of experimentation. Try different thresholds and ratios to see what sounds good to you. As you get more familiar with the tools and processes available, you will get faster at zeroing in on the best way to optimize the dynamics of your audio elements.
What you should remember:
- When music is a featured element, use the original dynamics of the recording
- Complex productions may call for submixes (also known as splits), which you may receive from a sound designer or want to make for yourself in order to simplify the mixing process
- Use compression on the music track to reduce its dynamic range and keep it from interfering with the dialogue
- On long productions or tight deadlines, try ducking to automatically keep the music softer than the dialogue
- With compression and ducking, experiment to find the best settings for maximum transparency
————
Wait, there’s more!
If you’ve enjoyed this tutorial, watch a FREE 3-part video series (over 40 minutes of training) that will teach you things like…the best methods for scoring a cut, how to create music changes and transitions, plus ways for adding variety to a cue – shown in a real-time editing demonstration.
Leave Your Thoughts & Comments Below:
Related Posts


