Today we'll be speaking with Robert Komatsu, ACE about his most recent film - Freaky…

Quick Tips for Cutting Music
As a video editor, you are the Swiss army knife of the production team.
Some days, people will expect you to do a whole lot more than editing video.It may be on the visual side of things, or you could be called upon to handle tasks that normally fall to the sound designer. And of course, there will be days when you’re expected to edit music.
If you have some music chops, you have a leg up on editors who don’t. And if you are an editor without any music editing skills at all, don’t panic. You can still do this!
In this article, you’ll learn:
- Which versions of stock music you should be looking for
- The best place(s) to make your cuts
- Why waveforms are so important and how to make sense of them
- A bonus music editing tip…so be sure to read on!
Two Simple Tips for Cutting Music
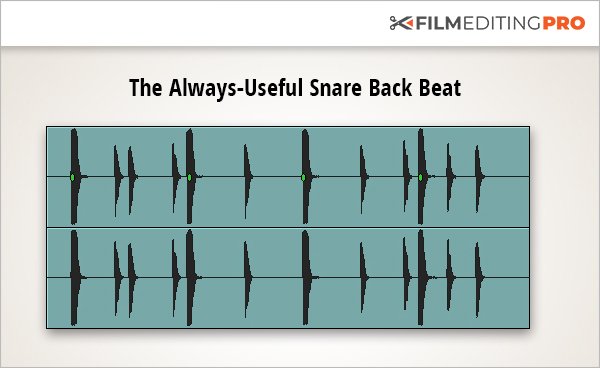
1. Find the Snare First
If the music track you’ve selected is structured like a song – as opposed to being more atmospheric and unstructured – there are probably drums in the mix. Where there are drums, there’s a good chance you’ll hear a snare drum hit on regular beats in each measure. The old-school name for this is the “back beat.”
The snare back beat is your secret weapon when it comes to editing music because it’s in nearly every bar, and gives you a great place to cut. It’s easy to hear and it’s easy to see in the audio wave form.
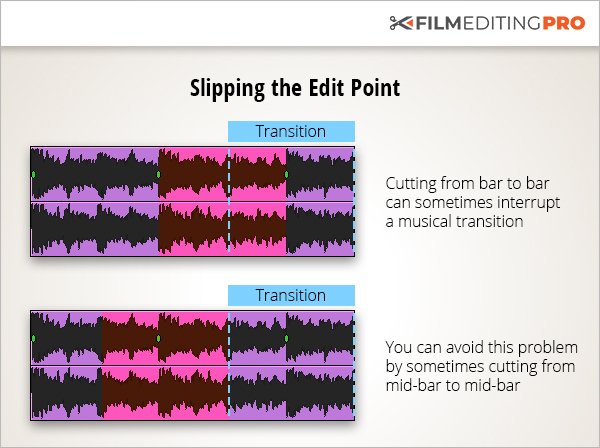
2. Slip the Edit Point
If you’re not very experienced in editing music you might think…
“Wait, why not just cut from the end of one bar to the beginning of another?”
Sometimes that works just fine and it’s an easy first edit to try. However, if there is a drum fill or some other transitional musical element at the end of the bar, you’ll be interrupting a transition. Plus, you’ll be cutting off any reverberation that would have spilled into the new bar. That might not sound so good.
How To Fix It:
Try moving the edit point back a bit and cut from the middle of one measure to the middle of the next. You’ll be cutting from earlier in each piece in order to sidestep the transition problem. As long as the two pieces are musically compatible, you can slip the edit point until you like what you hear.
If this sounds like gibberish, don’t worry. It will become clear once you’ve made a few edits. And remember, you can always “undo” any anything you try!
Why Waveforms Are Your Friend
When you’re looking for a snare hit to try your cut point, you can always use your ears and the “scrub” function in your software to locate the beginning of the sound.
However, you can also get a visual clue just by looking at the waveform in the vicinity of the snare hit. There is always a little peak right where the snare is located.
What You Need to Know to Read A Waveform
There are three parameters that affect the appearance of an audio wave form.
- Amplitude is the volume of the sound and is represented by the height of the wave. Taller is louder.
- Frequency is the pitch of the sound and is represented by the horizontal density of the wave. Denser is higher in pitch.
- Duration is simply how long the sound lasts.
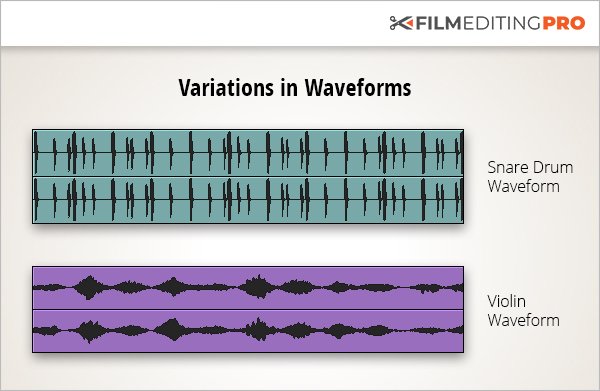
If you were to look at a recording of a snare drum all by itself, you would see that the sound has a very short attack, meaning it reaches maximum amplitude almost instantaneously. This is a very different sort of waveform from, say, a violin, which has a much slower attack.
That, and the fact that the snare drum wave form has greater amplitude (the snare is “hotter” in the mix) makes it easy to find visually, even when mixed with other instruments.
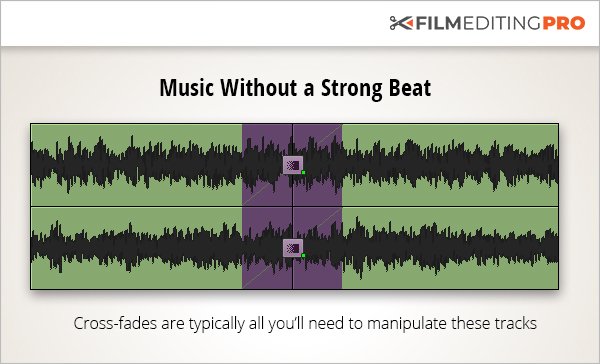
Bonus Tip! How To Edit Music Without A Strong Beat
It’s easy to edit when there are strong beats such as snare hits, but not all stock music has them. For atmospheric tracks – sometimes called musical textures or ambiances – the wave form isn’t going to help you much. Nothing will stand out. Yikes!
It’s okay. There’s another way to approach this. You’ll use the single most useful tool available for audio and video editing, the crossfade.
Here are a few simple steps to get you started:
- Cut from point A to point B in the music track to get the overall length you need. Don’t worry about how the edit sounds at the point where the pieces meet.
- Try a short cross-fade – say, 15 frames (a half-second) – over the edit point. If it sounds good, you’re done. Otherwise, keep going.
- Experiment with the length of the cross-fade and the edit point. Remember, you can slip an edit point forward or back and get a dramatically different outcome without affecting the overall length.
- Once it seems smooth, you’re done! With this type of music track, you don’t typically have to worry about preserving musical structure because there is none. Your edit could easily end up sounding planned and intentional.
Wrap Up
What to remember when choosing your music:
- Be sure to check out the variations available on your stock theme. It’s possible you’ll find a different version that will fit almost perfectly into your cut without much work!
- By learning how to read waveforms you can speed up your music editing process by quickly looking at the track without having to scrub back and forth.
What to remember when starting your edit:
- In tracks with drums, consider cutting on the snare drum if it falls in the same place in each bar.
- In music with no strong beats, use cross-fades to smooth out your edits. Experiment with slipping the edit point and varying the length of the cross-fade to find the best sound.
————
Wait, there’s more!
If you’ve enjoyed this tutorial, watch a FREE 3-part video series (over 40 minutes of training) that will teach you things like…the best methods for scoring a cut, how to create music changes and transitions, plus ways for adding variety to a cue – shown in a real-time editing demonstration.
Leave Your Thoughts & Comments Below:
Related Posts


