Today we'll be speaking with Robert Komatsu, ACE about his most recent film - Freaky…

How Pro Colorists Use SCOPES For Better Color Correction
Scopes – what are they, how do they work, and why should you use them? In this tutorial you’ll learn how scopes work in Resolve, but if you are a Premiere or a FinalCut user, don’t worry. The principles that we’ll be going over are relevant no matter what non-linear editing software you use.
Scopes, Brightness and Color
Scopes are tools that allow you to analyze your images. Resolve can display different kinds of scopes. If you click on the dropdown button next to where it says Waveform, you’ll see the different kinds of scopes that Resolve can display. To keep things simple, in this lesson, you’ll focus on understanding how the Waveform and Vectorscope work. Let’s start with the Waveform.

Before you go any further, let’s take a moment to talk about some technical terms used in this tutorial. Putting to one side the abstract qualities of an image like composition, there are two key principles of an image visually – brightness and color.
Brightness
How do you describe an image’s brightness? You can describe the image as bright or dark as a whole, or you can get specific and describe particular parts of an image:
- Shadows – the dark parts of an image
- Highlights – the bright parts of an image
- Midtones – the bits in between
Color
How do you describe the color of an image? Well, you can consider:
- Hue – the shade of color that it is. Is it red, yellow, or orange?
- Saturation – how intense is that color? How orange is that orange?
The Waveform Scope
Next to that dropdown menu from the earlier image is the Settings button. This allows you to customize the Waveform. At the moment, this Waveform in the image below is showing the luminosity or the brightness of the image. The Colorize checkbox is also turned on. Ordinarily, the Waveform would just be white against a black screen. Turning Colorize on helps because it makes it easier to read the Waveform, and you can identify which parts of the image you’re looking at in the Waveform based on their color. For example, you can see traces of the blue and the orange lights on the arms in the image.
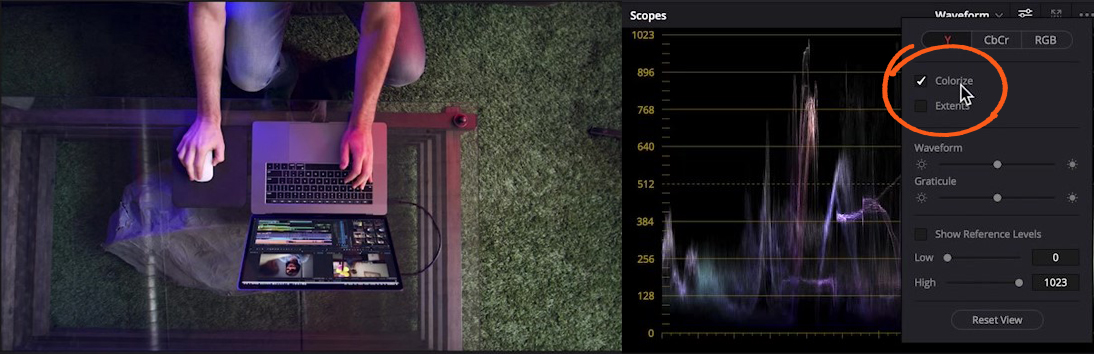
A Waveform is kind of like a graph that shows you how brightness or tonality is distributed throughout the image. Traces at the bottom of that graph represent parts of the image that are dark. Traces at the top of the graph represent parts of the image that are bright. Waveforms are great because not only does it show the tonality of the image but it helps you to understand where those tones are in the image.
Exposure and Balance
Waveforms are great tools for helping to ensure that the image is exposed correctly and is nicely balanced. In general, a good image will be balanced tonally. In other words, it’ll have a little bit of shadow, a little bit of highlights, and a nice even spread of midtones. The image above is a great example – you can see that there’s a teeny bit of shadow, a teeny bit of highlight, and the rest of the tones in the image are spread evenly.
However, this rule doesn’t work for every kind of image. For example, in the next shot below to the left, this is in a bright room. You can see that the Waveform is biased towards the highlights. And in the next image to the right, which is in a dark room, you can see that the Waveform is biased towards the shadows. Scopes are technical tools, but they need to be interpreted creatively. It’s important that you understand what kind of an image that you’re producing. When you understand the kind of image that you’re producing, then you’ll know how to interpret the Waveform and adjust the image accordingly.

Contrast
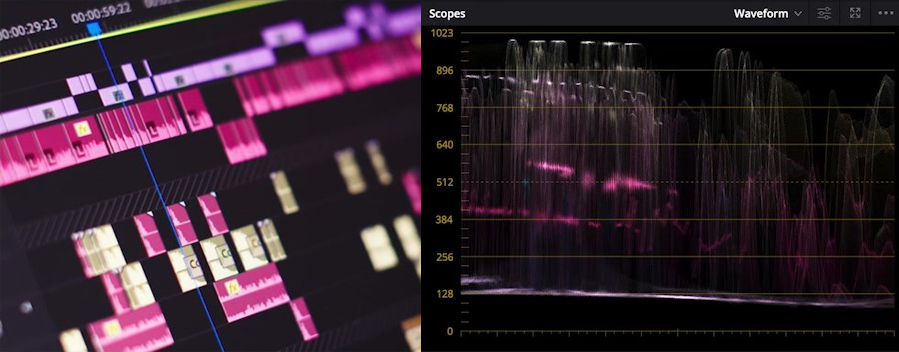
Not only can Waveforms be used to understand whether an image is correctly exposed, they can also be used to help you understand how contrasty the image is. In general, when an image is considered contrasty, it means the image has bright parts and dark parts in it and there’s a very quick transition between the two.
The image below is contrasty. You’ve got all of those bright clips against that dark black timeline. You can see this in the Waveform. There are lots of highlights in the image, and lots of shadows in the image too. While there are some midtones in the middle, you can see that the image is predominantly either bright or dark. Not only do scopes help you to understand the images that have been delivered from production, but they can also aid you when you’re making adjustments to the image.
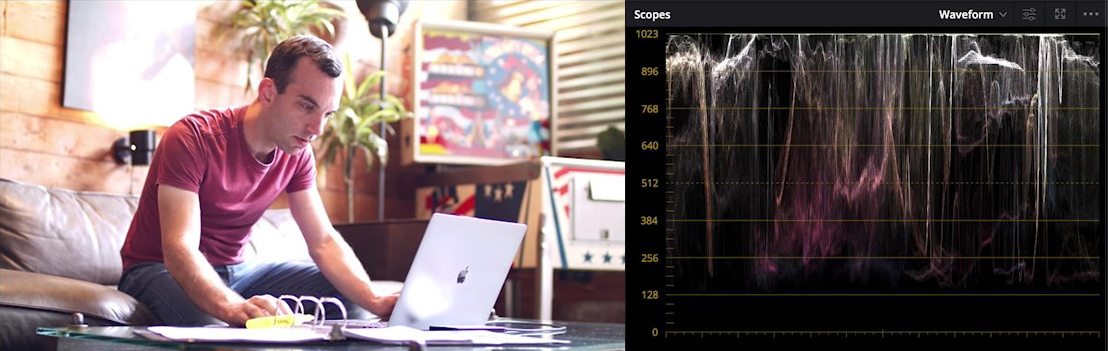
Let’s go back to the image of our trainer Brian sitting at the coffee table. In the Waveform below, the 1023 line represents the brightest value that the image can store, and the zero line represents the darkest value that the image can store. Simply put, you can’t make something brighter than white and you can’t make something darker than black.
If you manipulate the image and push parts brighter than white or darker than black something called clipping or crushing occurs. Any tonality or detail in that part of the image will be destroyed, something you’ll want to avoid because it looks pretty terrible. Parts of the image below have been pushed to be brighter than white, you can see that there is no longer any detail or tonality. They’re just washed-out white parts of the image, it doesn’t look very good.
Let’s look at the opposite when you try to make stuff darker than black. As you can see in the next image below, all dark values have been crushed and bunched up around the zero line here. It has the same effect on the image. You lose tonality, texture, and detail in those parts of the image that have been tried to push blacker than black. Again, this makes the image look terrible.
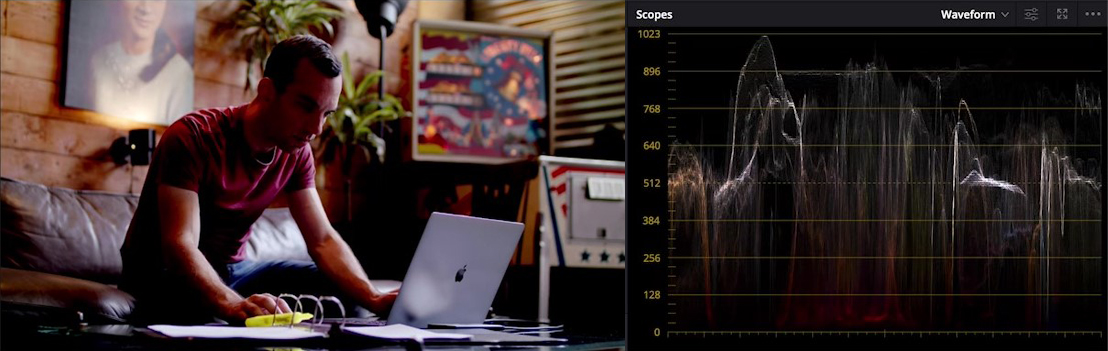
When you’re adjusting your image to redistribute or change its tonality, the Waveform is an incredibly powerful tool for making sure that you’re not making destructive changes to the image. You can make these shadows in this image a little bit punchier by dragging the lift down, but while doing that, you want to keep an eye on the Waveform to make sure that you’re not crushing your blacks.
The Vectorscope
Whereas the Waveform is really good for analyzing the brightness of an image, it tells you almost nothing about the colors in the image. On the other hand, the Vectorscope is terrible for reading the brightness of an image. Instead, it focuses on giving you information about the colors in an image.
The circle represents all the colors that an image is capable of displaying. It follows the same pattern as the color wheels that you see in Resolve. You also get a nice reminder of how the colors are laid out in this scope, thanks to these red, yellow, green, cyan, blue, and magenta targets that are drawn onto the scope. Colors in the image are indicated by a trace that reaches out from the middle towards where that color would be plotted if this were a giant color wheel.
Looking at the Image above, you can see that it contains pinks and lilacs, some yellows, and some blue. You can see those colors drawn in the scope. The pinks, the lilacs, the yellows, and the blue. The distance that the trace travels from the center of the scope indicates how saturated or how intense that color is. Looking at this scope, you can see that the pink is one of the most saturated colors on the screen. Take a look at the scope of the original clip below to the left. If you manipulate the saturation of the image, you’ll see the trace getting larger in the center as the saturation increases, and smaller in the image to the right as it decreases.
Wrap Up
So why are scopes so valuable to a colorist? Viewing images on a monitor can be an incredibly subjective experience. Depending on the viewing environment or the quality of the equipment, you’ll see and perceive the image differently. Scopes allow you to analyze and to define an image objectively, but remember; scopes aren’t the whole story. You need to understand the context of the image in order to be able to read scopes properly.
For more tutorials about DaVinci Resolve or creative editing in general be sure to visit our training page. There, you can sign up for hours of free sample videos and more information about our full courses.
Leave Your Thoughts & Comments Below:
Related Posts


