We've all heard of Speed Ramping, but how can you actually use this tool effectively…

The 4D Editor: Techniques for Showing the Passage of Time
All editors work in four dimensions. The 3D visual space of the footage…and the 4th dimension of time.
As we all know, to improve the pace of the edit and keep the run-time reasonable, films will skip through periods of time by cutting unimportant events.
Editors can get away with this because the time between scenes is usually inconsequential to the narrative and therefore, it is not necessary to explain in detail. However, it’s important for the audience to understand how quickly time is moving.
In this illustrated tutorial, we’re going to examine 5 editing techniques for showing the passage of time. But first, let’s briefly consider why it’s important.
Why is the passage of time important?
In its simplest form, a narrative depicts change over time. This could be the transformation of a character’s ideals and personality or the progression of a series of events. In either case, time gives context.
In general, the longer something takes the more effort is involved. Let’s illustrate with this classic example from Rocky:

Which do you think works better? Although both scenes end the same, the length of the latter implies struggle.
In other words, if we can help the audience understand the passage of time, they’ll connect emotionally with the drama. But if we fail, the narrative could become confusing. Let’s explore some of the common techniques that editors use to show this…
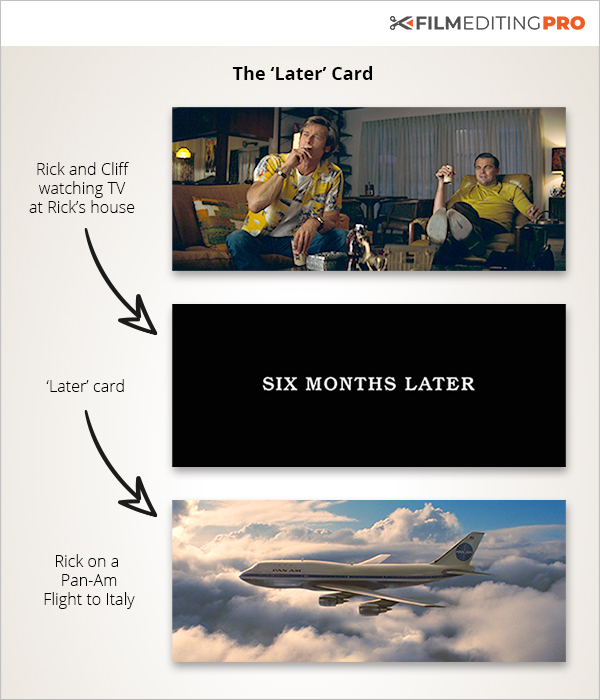
1. ‘Later’ Cards
This straightforward use of text to communicate the passage of time is obviously quite effective. Many old films, or new films with a very specific style like Once Upon a Time in Hollywood, use a simple card to show us exactly how much time has elapsed.
As the language of editing progressed, editors learned to communicate ‘later’ solely with footage and effects. Let’s look at some examples.
2. The ‘Later’ Dissolve
One of the most established techniques for showing the passage of time is the humble dissolve. You can dissolve from one shot to another or you can dip to black and then to the new shot. Generally, the longer the dissolve, the longer the period of time that has elapsed.
In this example from E.T., if the editor had simply cut from night to morning, it may have momentarily confused the audience. The dissolve signaled a jump in time helping us to understand the following shot is later. Additionally, it allowed the audience to adjust and process the new scene.
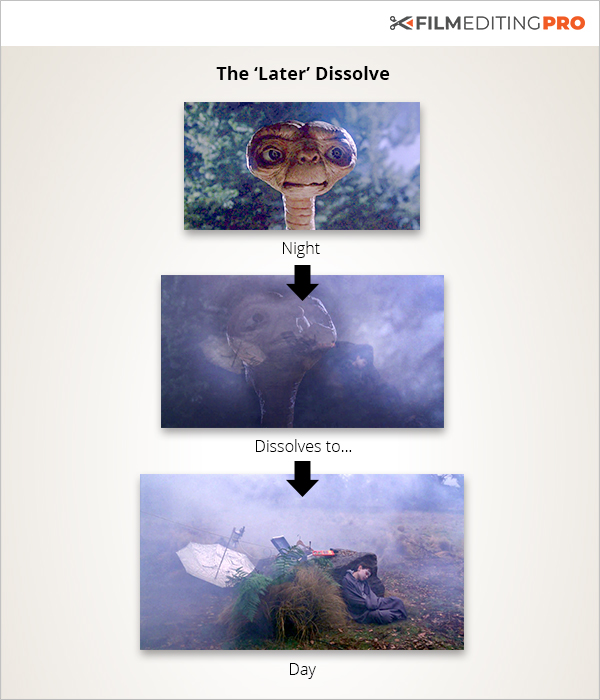
Dissolves have the added benefit of creating a connection in the viewers mind between the subject of the outgoing shot and the subject of the incoming shot. As E.T. looks up toward his home among the stars, we dissolve to the machine he is using to ‘phone home’.
Watch out!
Choose your shots and timing carefully to avoid awkward transitional compositions. Shots with negative space work well for dissolves. Excessive movement can also disorient the viewer. Dissolving between two shaky handheld shots might give your audience motion sickness! Statics or pushing in/pulling out work best.
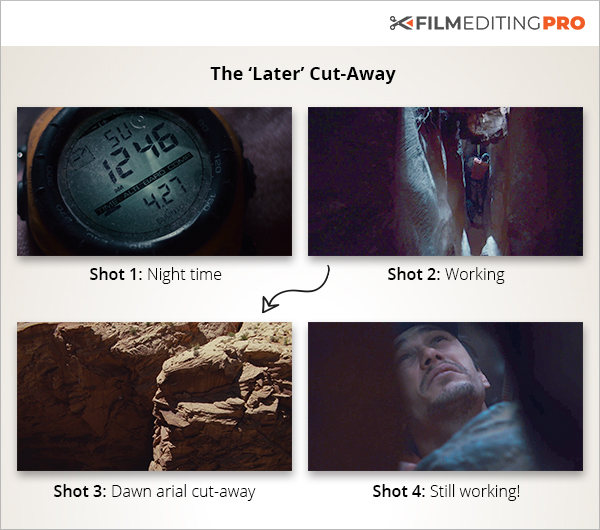
3. The ‘Later’ Cutaway
Another common technique you might see is the ‘later’ cut-away. Cutting from a scene to a different visual and then back can also signal the passage of time.
In this example from the film 127 Hours, without the aerial dawn shot, the passage of time would not be obvious and the audience might not have realized Aaron worked all night to move the boulder, especially as the lighting conditions in the deep canyon have remained very dark.
Watch out!
You can’t just use any shot as a ‘later’ cut-away. It should contain visual information that tells the audience how much time has passed.
For example: the rising sun or the progress of an event like a house being built.
Choosing a shot that is distanced from the main action helps to punctuate the scene, in effect momentarily breaking the continuity. However, it should still be in the same location or a related location.
4. The ‘Later’ Jump Cut
Dissolves and cut-aways take time. Is there a faster way of skipping through time? Perhaps the quickest way of propelling your edit forward is a jump-cut. Its efficiency makes it particularly useful when you need to make several quick and successive ‘time jumps’.
In this example from the film Groundhog Day, context makes the transition work. Because a slap to the face usually results in the end of your planned evening and given the well-established premise of the film, we understand that each successive jump-cut is showing a new day.

Watch out!
Jump-cuts can be jarring, so try to choose shots that feature common elements, for example; similar compositions, the same characters or the same locations. In our example, all the shots focus on Phil but the editor has also cleverly chosen shots that alternate his screen direction further helping the audience to understand that each successive shot is showing a different moment in time.
5. The Montage
While most ‘later’ transitions create a single jump in time, montages can be used to describe a period of time. Many montages are designed to show change like two people falling in love or a scientist researching and building something revolutionary. However, other montages can even show that a character is not changing even though the world around them is. Picture a depressed person lying in bed while we see the seasons change outside their window from summer to fall to winter to spring.
You could say that ‘later’ transitions like cards, cutaways and dissolves take us straight to the destination, but montages show us the journey.
As mentioned, montages are often used to show personal transformations or the progress of a project. The perception that something takes a lot of time contributes to its perceived realism and helps the audience to relate to what they’re going through.
Let’s look at an example of this type of montage.
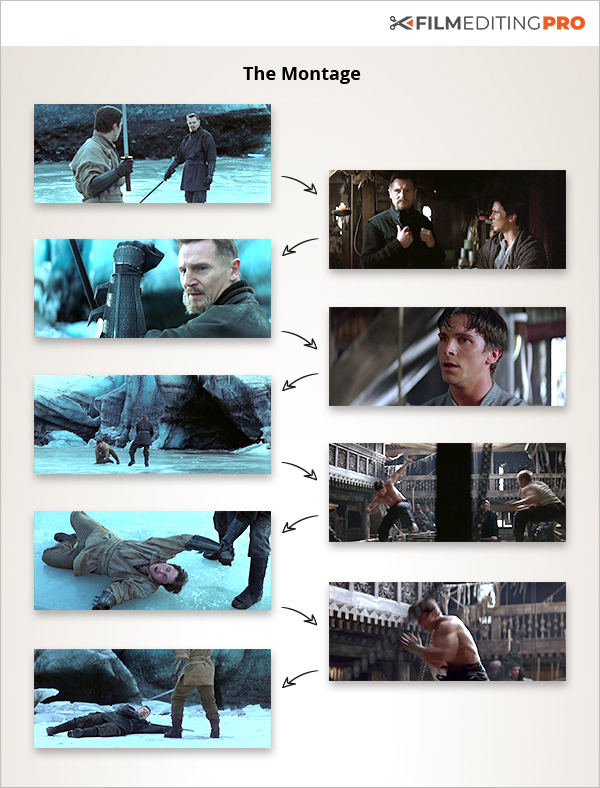
The Training Montage
The training montage is designed to show a character’s physical and personal development. They are usually accompanied by music.
Progressively cutting through different scenes along with driving music and structured visuals gives the impression of a longer and more arduous training regime. Without the cross-cutting or the driving music, the scene could feel like a few short training sessions. In the illustration below from Batman Begins, that would mean that the development of Bruce Wayne’s incredible fighting skills would seem unrealistic! We don’t have time to watch 3 months of training in our film, but we need to understand it took a lot of effort and devotion.
Watch out!
Make sure the scene builds. The character should progress from failure to victory. Choose visuals that establish this pattern clearly. Start with shots that show your character struggling, end with shots that show him or her succeeding.
Common Editorial Elements
Even though we have examined 5 very different techniques for showing the passage of time, there are actually some common elements that make all of these work.
Here are a few to keep in mind:
1. Temporal References
-
- ‘Later’ Transitions: Include visual (or sometimes audible) elements that help you to understand how time is passing. Some shots use a clock, but you don’t need to be that obvious, it could be the rising sun, a character gradually gaining skill, the aging on someone’s face and much more.
-
- Montages: When choosing shots, avoid ambiguity. The audience doesn’t have time to search the frame for subtle clues about the passage of time. If a certain shot is important but could be confusing, linger on it long enough for their mind to catch up.
2. Visual Bridges
-
- ‘Later’ Transitions: The visuals clearly need to show change but don’t want to overwhelm the audience with too much information. Try smoothing the transitions by finding shots that share common elements such as lighting, movement or subject matter.
-
- Montages: When cross-cutting montages, try cutting on action. This creates a sort of continuity between two shots and helps to imply that the character is working towards the same common goal in both.
3. Music and Sound
-
- ‘Later’ transitions: A change in pitch, pace or volume. If sound or music played consistently across the transition, the audience might miss its significance. Shifting the cue in some way indicates that something has happened in the film.
-
- Montages: Music and sound are the drivers, gluing the disparate shots together into one single harmonious scene. Training montages typically need driving and rhythmic music. Waiting montages are usually best served by melodic thoughtful music.
Get Creative
Are you having fun? We’ve only just scratched the surface! Here are some examples of more exotic ways of showing the passage of time.
Instead of a dissolve, have you thought about a match dissolve? If you have the resolution, try scaling and moving your clips so that elements in your outgoing and incoming clips line up. Saving Private Ryan features an awesome match dissolve that jumps forward 50 years.

Time-lapse shots are a great way to show the passage of time. They can be used like a dissolve or a cut-away. Lord of War has a great time-lapse transition showing the dismantling of a plane while the main character looks on helplessly. If you don’t have something specifically filmed to be a time-lapse, can you slip a speed ramp into a long shot and show the action in fast forward?

Wrap Up
The nature of filmmaking is to play with time. Many parts of real life are obviously too slow and mundane to play out on the screen. Not to mention, imagine how many bathroom breaks you’d have to take if you watched an 18-year long movie? It’s tough to sit through two hours!
The ability to abbreviate time elegantly and seamlessly in your editing allows us to take long complex stories and share them with our audience in a format that holds their attention. Even simple techniques, when used in the right place, can have a profound effect on your ability to do exactly that.
Enough talking! Let’s go edit something!
If you’d like to learn more about film and drama editing, be sure to sign-up for our course, The Art of Drama Editing. Enrollment closes on August 10th at 11:59pm Pacific Time.
Leave Your Thoughts & Comments Below:
Related Posts


