Today we'll be speaking with Robert Komatsu, ACE about his most recent film - Freaky…

The Editor’s Guide to Mono vs Stereo Audio – Premiere Pro Tutorial
A lot of editors tend to get a bit careless with how they work with mono or stereo audio, and it can have a negative impact on how the final mix ends up sounding when exported.
This in-depth tutorial for Adobe Premiere Pro will help you understand the proper way to work with your audio. Watch the video or keep scrolling for the written version!
Mono Audio and Stereo Audio – What’s the Difference?
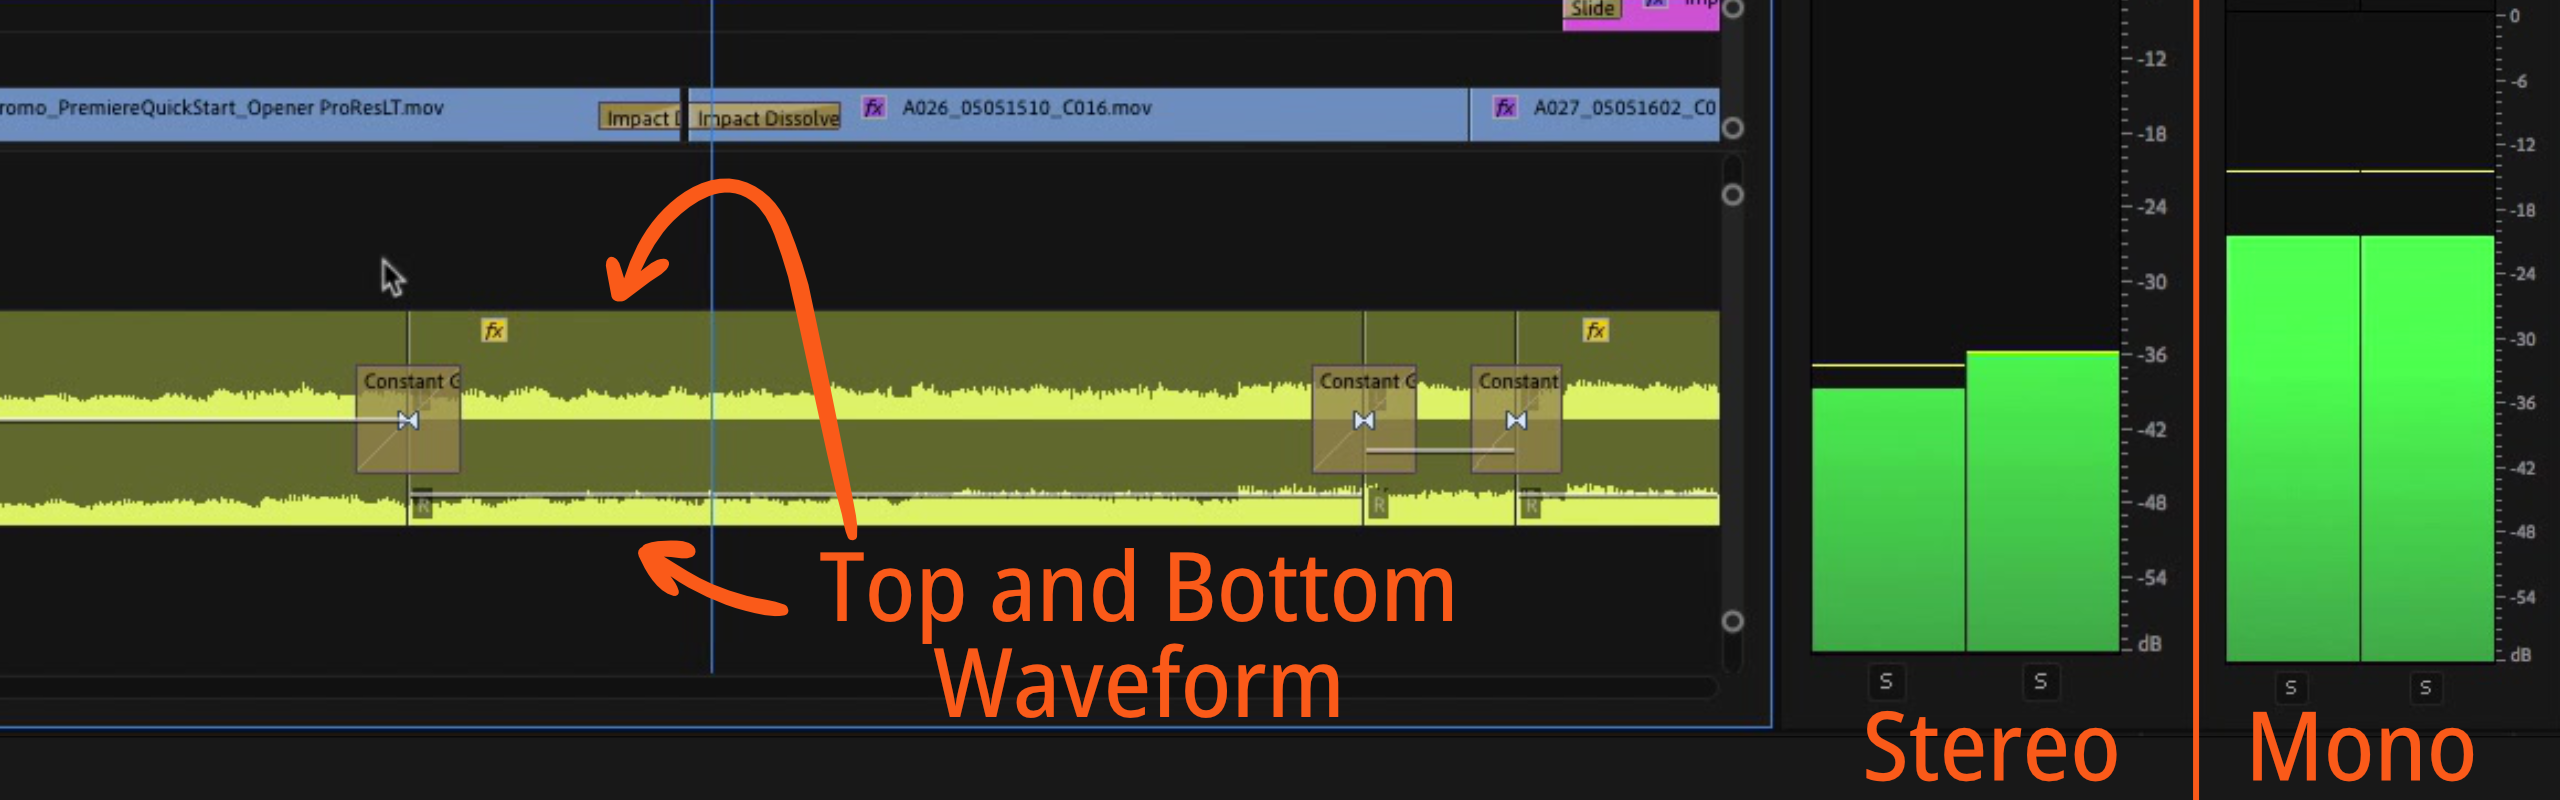
In Premiere Pro, if you were to click on any stereo audio clip, it will highlight both the top and the bottom waveform. What this means is that the audio is coming out of both the left speaker and the right speaker. If you play back a stereo audio clip, do you notice how the left side and the right side of the audio meters are bouncing at different levels?
That’s because in a stereo track, the audio coming out of the left speaker is slightly different than the audio coming out of the right speaker. Now if we used a mono track, these would be exactly identical and even.
How to Sync Audio to Footage
For this example, we have a video clip of our Premiere expert Brian, standing outside, recording on his iPhone. Additionally, we also have some audio that he recorded separately for this footage.
So, in our timeline we have the video, the video’s audio track, another audio track recorded separately. First, let’s go ahead and sync up the audio. In the clip, Brian claps his hands one time. Now listen to the audio that was recorded.
If you identify the exact frame that Brian’s hands clap, you can make an edit point right there.
Next, look at the recorded audio visually on the timeline where that clap actually occurs, and you can make an edit point there as well.
Finally, you can simply drag the audio along the timeline so that the two edit points line up to each other. You may have to do a little bit of shuffling around, like moving the video clip over, but now you have the audio lined up to the video recorded.
This is a very ‘poor man’s’ way of syncing up the audio, but for our demonstration purposes right now, this is all we need to do.

Working with Multiple Audio Sources
Next, you’ll probably want to remove the audio from the camera (blue as in the timeline above), as it doesn’t sound very good compared to the audio track that was recorded using a Zoom H4n Recorder (Green).
Listen to the same audio clip below, but this time with some headphones on, because you’re going to hear a very clear difference between the two different audio sources on this clip.
Let’s figure out what’s going on with the audio here. If you were listening with your headphones, you probably realized that at some point you heard Brian bump the lavalier microphone with his hand while he was discussing it. The lavalier microphone should be on your left ear while the boom microphone should be on your right ear. If you didn’t hear that, play back the clip again.
This is a really good demonstration of what a stereo track actually is, It means that the audio on the left side of the track is different from the audio on the right side of the track. In this example, what happened is that the boom microphone was plugged into the right channel of Brian’s two channel recorder, and on the left channel of that same recorder was the lavalier microphone.
It’s not ideal that you can hear the lavalier out of your left ear and the boom out of your right ear. In fact, this is actually a common problem that you may run into while you’re beginning to do work on different projects, especially in the documentary or corporate space where you may be conducting an interview with one boom microphone and one lavalier microphone.
In this example a stereo track of dialogue was recorded, however music is something that should be stereo. It’s intended that you hear different instrumentation on the left ear than you might hear on the right ear, but when it comes to something like dialogue, you would not want that to be the case, as demonstrated here, because we want to be able to do a couple of different things.
Converting Stereo to Mono
The first thing that we want to be able to do with this particular clip is fix the problem that’s occurring with the lavalier when Brian smacks it with his hand. The second is you want to separate the lavalier and the boom into their own individual channels, so that you can hear the same dialogue out of both ears.

The first thing you’ll want to do is to right click on the audio clip in the bin, and in the menu go to Modify, Audio Channels. This clip was imported as a stereo clip, so what this menu is saying here, essentially, is that this clip was imported as stereo using the properties of the file when it was imported. If you wanted to turn this into a mono clip, what you can do is change the preset from ‘Use File’ and tell it to become ‘mono’.
This is going to change the file a little bit – now the first and second channel of the clip will become individual clips, so it will be two mono clips as opposed to a single stereo clip.
When you click ‘Ok’, a warning message appears which basically says that this clip is already being used in a timeline, and that when you go ahead and apply this clip modification, it’s not going to affect the clips that are already in the timeline. Hence, when you click ‘Ok’, nothing’s going to happen – nothing has changed.
However, what has changed is the way that this clip works in the bin, so now if you were to take this clip and drag it back into the timeline you now have two completely unique clips, the left channel and the right channel.
Listen to the edited clip below very carefully with your headphones and take a listen to how it sounds a little bit different now:
You probably noticed that this time around you can now hear it out of both ears. Here’s what happened: the tracks are both mono, which means that the audio that you hear from this track is going to be heard on both ears evenly.
But here’s why this is really important, because now the left track is only the lavalier microphone, and the right track is only the boom microphone. This means that you can fix this audio issue on the lavalier microphone by simply lowering the audio of the left track for that section, or disabling this clip entirely.
So go ahead and duck out the audio. Ducking is when you take a piece of audio and lower it or remove it from the other audio in your scene.
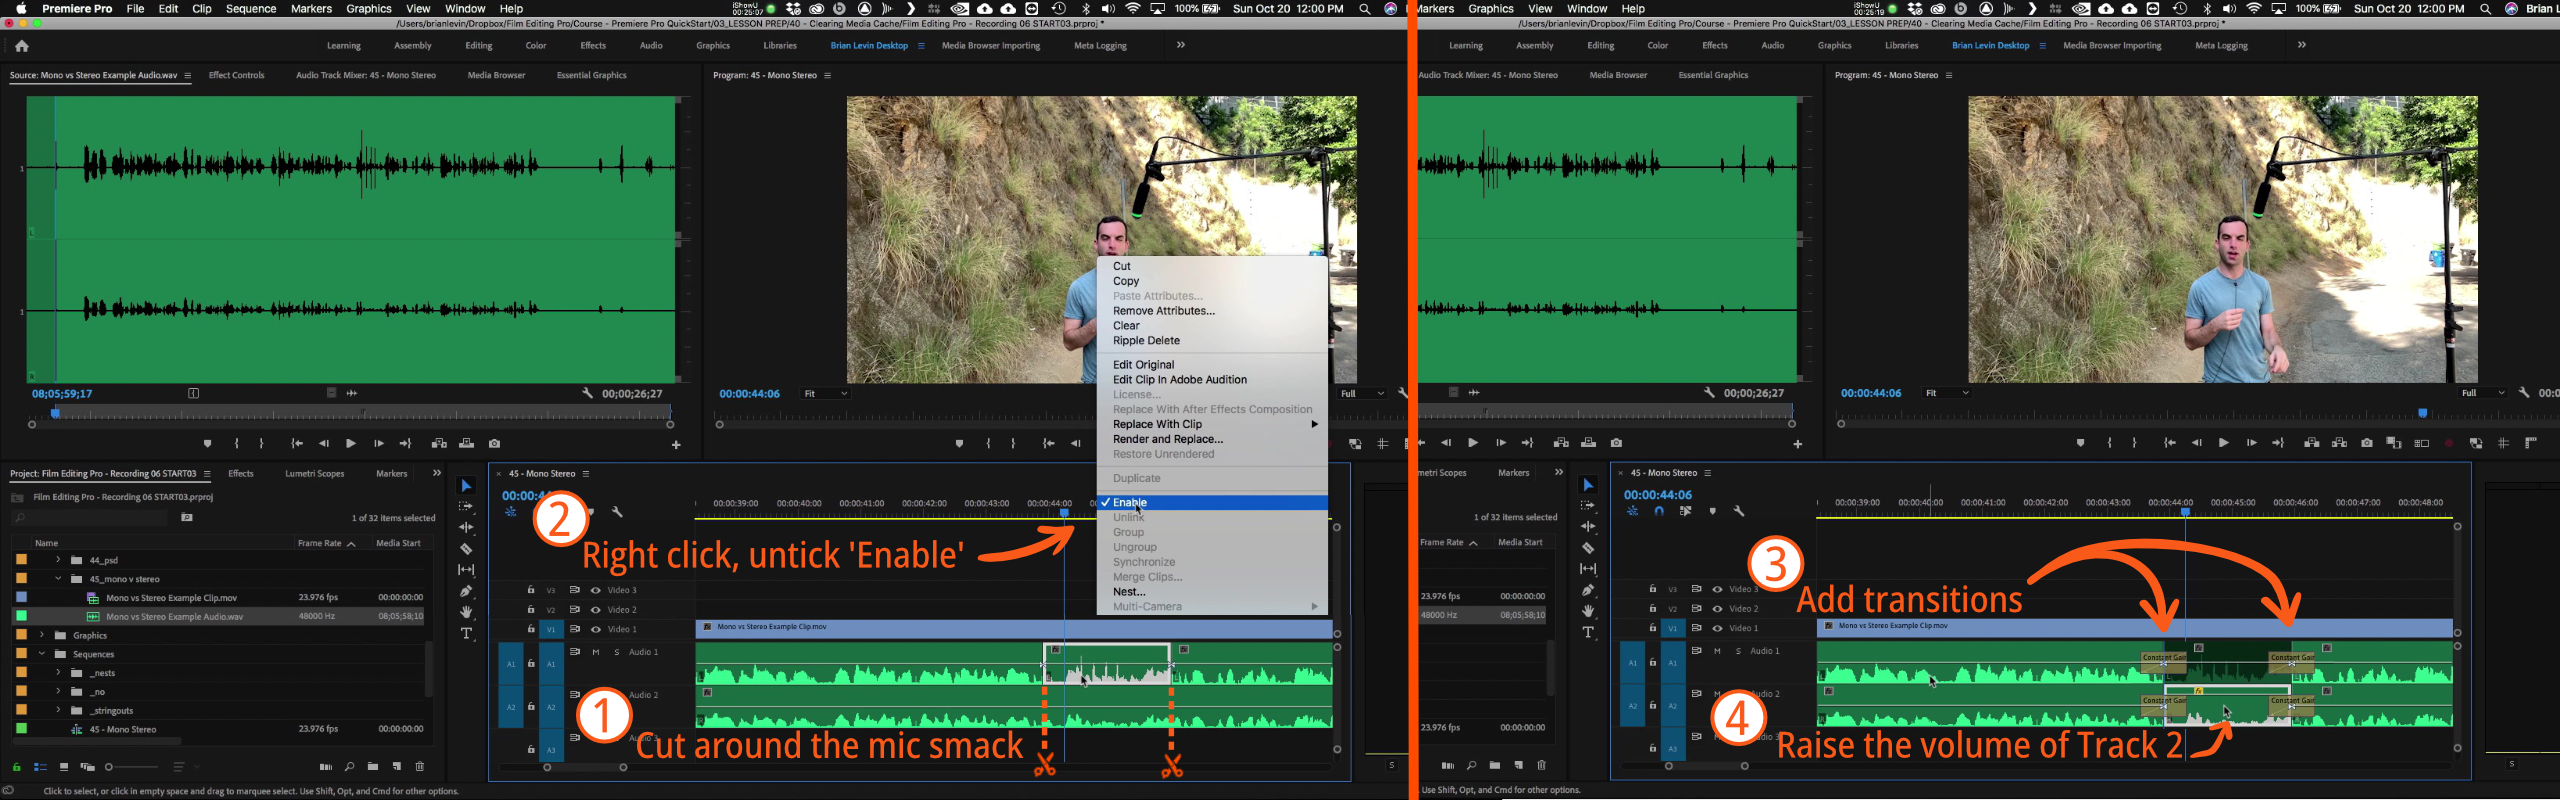
If you make cuts in the audio around the lavalier and select the clip, right click, and uncheck ‘Enable’ – this turns the clip off just for the smack. And since we don’t want to have a sharp moment where it turns off, you’ll want to add an audio transition before and after the silence. This will essentially leave the lavalier on and then fade it out entirely, before fading it back in.
Listen to the clip again now:
You can definitely hear that there’s a difference, right? With the lavalier turned off, it sounds a little bit different because in this moment right here, we’re only hearing the audio from this one boom microphone.
What you might do to resolve this is to raise up the volume of the boom mic, by cutting in the same places as the lavalier mic audio track and raising the audio for that small section. Listen once more to just the mic smack, but before and after we’ve corrected the audio:
This is something that you may have to do often when you have multiple audio sources in a scene, and it’s a great demonstration of what the difference is between mono and stereo audio.
Mono audio is something that you hear out of both ears evenly, and stereo audio is something that you hear out of each ear independently.
Editing Audio Mid-Project
But what if you need to convert some dialogue audio to mono after it’s been cut and edited into a project? Will you have to convert each edited clip individually?
Yes and no – there is a very fast way to deal with this, using the match frame function.
First, go to the Premiere Pro menu, find the ‘Preferences’ drop-down menu, and select ‘Timeline’. You’ll want to find the ‘Match frame set in-point’ checkbox and uncheck it, and click ‘Ok’.
Now this is a great example of how to use match frame in a slightly different way than usual. Let’s say you realized a little bit too far into the editing process that the audio should actually be two mono tracks and not one single stereo track, but you’ve already done lots of work, so you don’t want to redo it.
There are two ways to solve this – let’s start with the bad way so you can see the difference.

Duplicate the audio clip you want to convert to mono and place it on the track below, as shown in the picture above highlighted with an orange box.
Next, go to audio effects, and Fill Left with Right and Fill Right with Left. If you’re confused, don’t worry, it’s confusing – you want to apply the ‘Fill Left with Right’ effect to one of the audio clips, and ‘Fill Right with Left’ to the other clip, which converts the dialogue clip to mono.
Now, here’s why this isn’t great – If you’re looking at the audio tracks and you’re wondering which one of these is which microphone, don’t worry, you’re not alone. It’s difficult to tell what you’ve actually done here, and there is a lot of audio on screen to pay attention to. It does technically work, but you’d do well to avoid this method of adjusting your audio tracks. Instead, let’s do that work a little bit more manually, but with a slightly better visual result on your timeline to reduce clutter.

We’re going to use the power of match frame and three-point editing to fix the problem. Select the first audio track, go to the beginning of it, and push the F key. That fits the in point and out point of the clip on the timeline.
Now you could use the audio dragger, to drag it into your timeline or, better yet, use a shortcut key. The shortcut key should be the period (.) key on your keyboard.
Next, push the down arrow to go to the next clip and repeat – push F to match frame, and then the period key to overwrite.
Down again, F to match frame, period key to overwrite, repeat this until all the audio clips have been overwritten.
This is a pretty quick method, especially if you had a really large timeline with a whole bunch of this that needed to be done to it, and it produces a much better result visually on your timeline.
Importing Audio
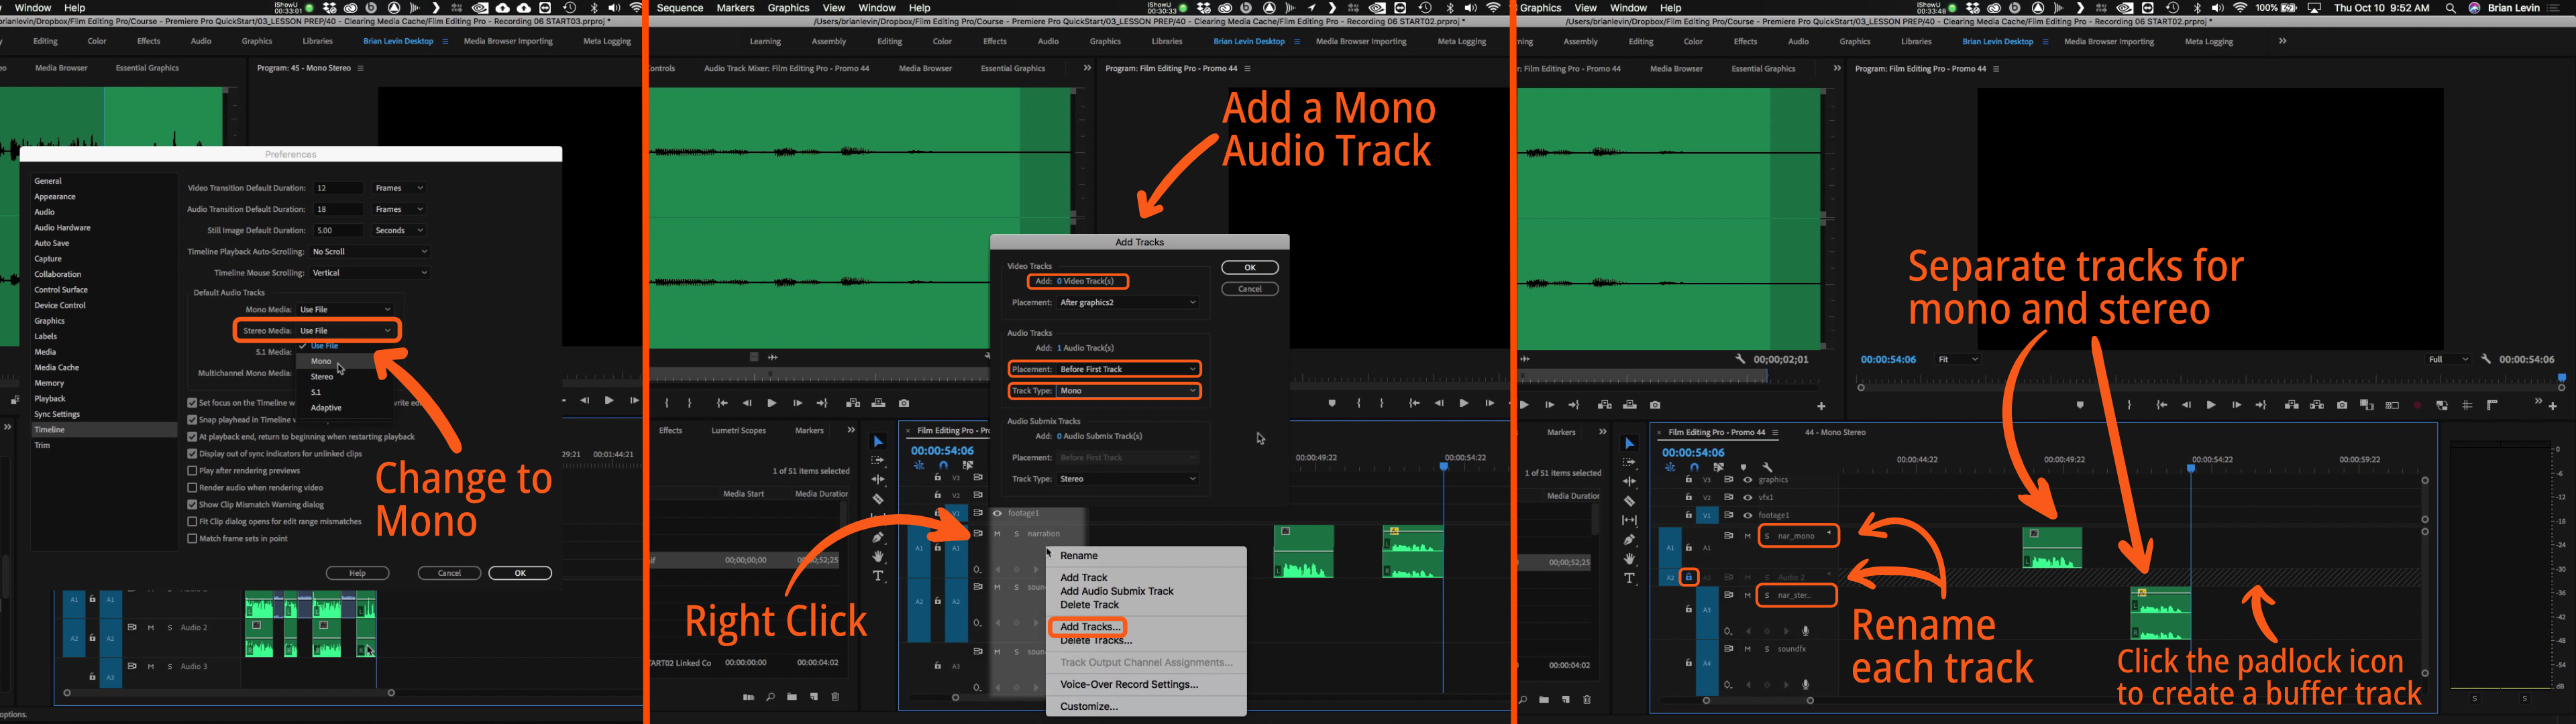
If you’re in a situation where you know what kind of audio elements you’re going to be importing into your project, you might want to go into your Timeline Preference menu before you do any actual importing. In this menu under ‘Default Audio Tracks’, we have several drop-down options which decide how Premiere handles the importing process.
If Premiere detects that the media is mono, you should use the properties of the file, so the ‘Mono Media’ option should stay as ‘Use File’. But in some cases, you may import stereo media, and you can tell Premiere to import your stereo media as a mono file.
This would be useful if, for example, you had that piece of dialogue recorded from the movie set, and the left channel had a microphone attached to it and the right channel did not, making it completely blank or empty. We wouldn’t actually need that right channel, and it would only get in the way of our timeline, so you might choose mono before you import those files.
Mono and Stereo audio need to go into their own separate audio tracks on your timeline.
To do this, right click the space to the left of the Timeline and select ‘Add Tracks’. You’re going to get a dialog box showing what kind of tracks you want to add. You can choose to add video tracks, but if you just want audio, you’d need to change that number to zero.
Next, we can choose where to place it, and then the track type. A standard track type means it will take on the properties of your timeline. In this case, we have a stereo timeline, so it will make a stereo track, but if you click on the drop-down menu you can change it to mono. After changing it to mono and clicking ‘Ok’, you can then move all your mono audio into that track to separate it from your stereo audio.
The difference between these two tracks is how Premiere is going to output that audio when you’re done. If you were to take mono audio and put it in a stereo track or put stereo audio into a mono track, when Premiere outputs it, it’s going to raise or lower the volume of that audio depending on which track you dropped it in, and you may not notice that in your headphones while you’re editing, but it will occur on the final output.
It’s important to get the right audio tracks in the right places, and to really understand this concept between mono and stereo.
To visually separate the mono and stereo tracks, what you can do is add a track between them, and then lock the track. This way, you can’t accidentally move a mono clip into a track that it shouldn’t be in, and there’s a visual divider in your timeline between the different types of tracks.
It’s important to keep these labeled, so you might rename them ‘Narration Mono’, and ‘Narration Stereo’ for example. You could even shorten them to ‘nar_mono’ and ‘nar_stereo’, and now it’s easy to identify which tracks are which.
More Audio Information
One good way of knowing what type of audio track you have is to go over to your bin, select an audio file and push the tilde (~) to expand. You’ll see a lot of data fields in this menu, and one of them says Audio Info.
This tells you the specifics of your Audio – for example the narration audio file is 48 kilohertz, 24 bits, and it tells you that it is a stereo track that’s mapped to two mono tracks. So, it’s a good way to see what format your tracks originally are, and if you realize you’ve made a mistake, you can right click the file, select ‘Modify’, ‘Audio Channels’, and you can then turn it back into a stereo track by choosing the relevant preset for that clip.

Wrap Up
That was a lot of info on what seems like a simple topic! However as you’ve learned through this tutorial, it’s really important to understand how Premiere handles Mono and Stereo audio differently, so you can correctly use both to nail that edit you’ve been working on.
For more tutorials about Premiere Pro or creative editing in general be sure to visit our training page. There, you can sign up for hours of free sample videos and more information about our full courses.
Leave Your Thoughts & Comments Below:
Related Posts


